If you’ve ever spent twenty minutes hunting for your trowel while your coffee gets cold inside, you already know the struggle is real. A disorganized shed can turn a relaxing Saturday morning in the garden into a full-blown archaeological dig through rakes, tangled hoses, and mysterious bags of fertilizer. The good news? With a few smart garden tool storage ideas, your shed can go from chaotic catastrophe to genuinely satisfying and stay that way all season long.
Whether you’re working with a tiny lean-to shed or a sprawling garage wall, there’s a solution here that fits your space, your budget, and your vibe. Let’s dig in (pun absolutely intended).
1. Install a Pegboard Wall for Instant Visibility
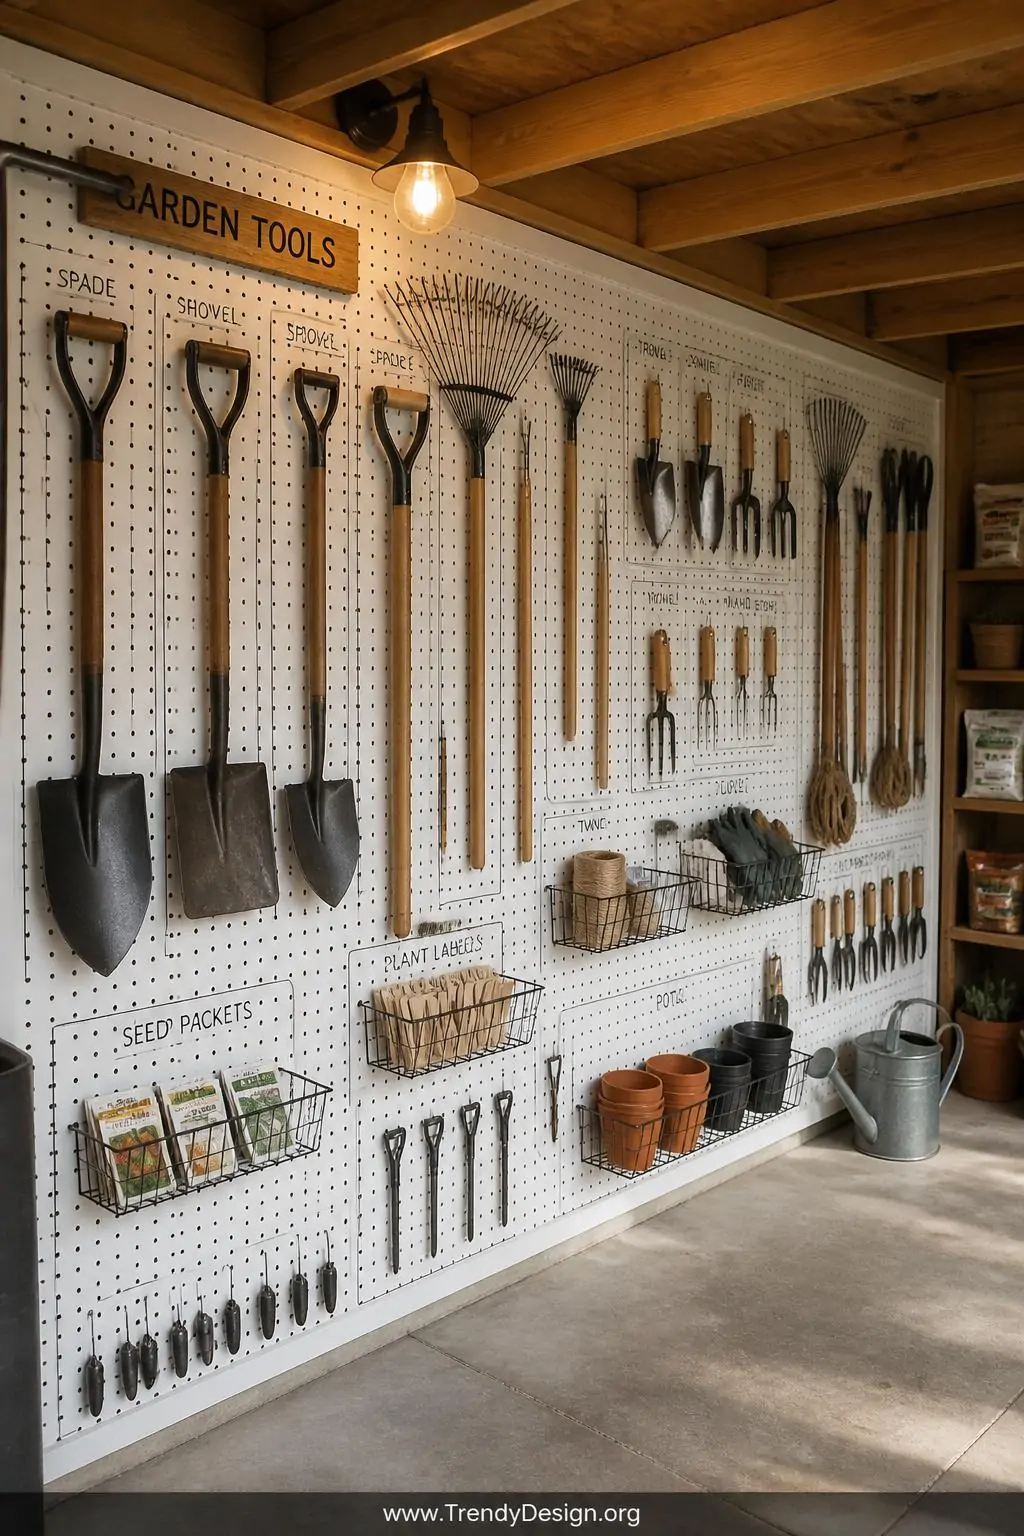
Pegboards are the classic solution that never goes out of style, and honestly, there’s a reason every organized shed seems to have one. You can hang hooks, bins, and holders in any configuration you like, and rearrange them as your tool collection grows. Everything stays visible at a glance, which means no more digging around blindly.
Mount a full sheet of pegboard or two along the back wall of your shed and assign a specific spot to each tool. Add outline labels with a marker so you always know exactly where things belong. FYI, pegboard is incredibly affordable and can be found at any hardware store, making this one of the easiest wins on this list.
2. Build a DIY PVC Pipe Tool Holder
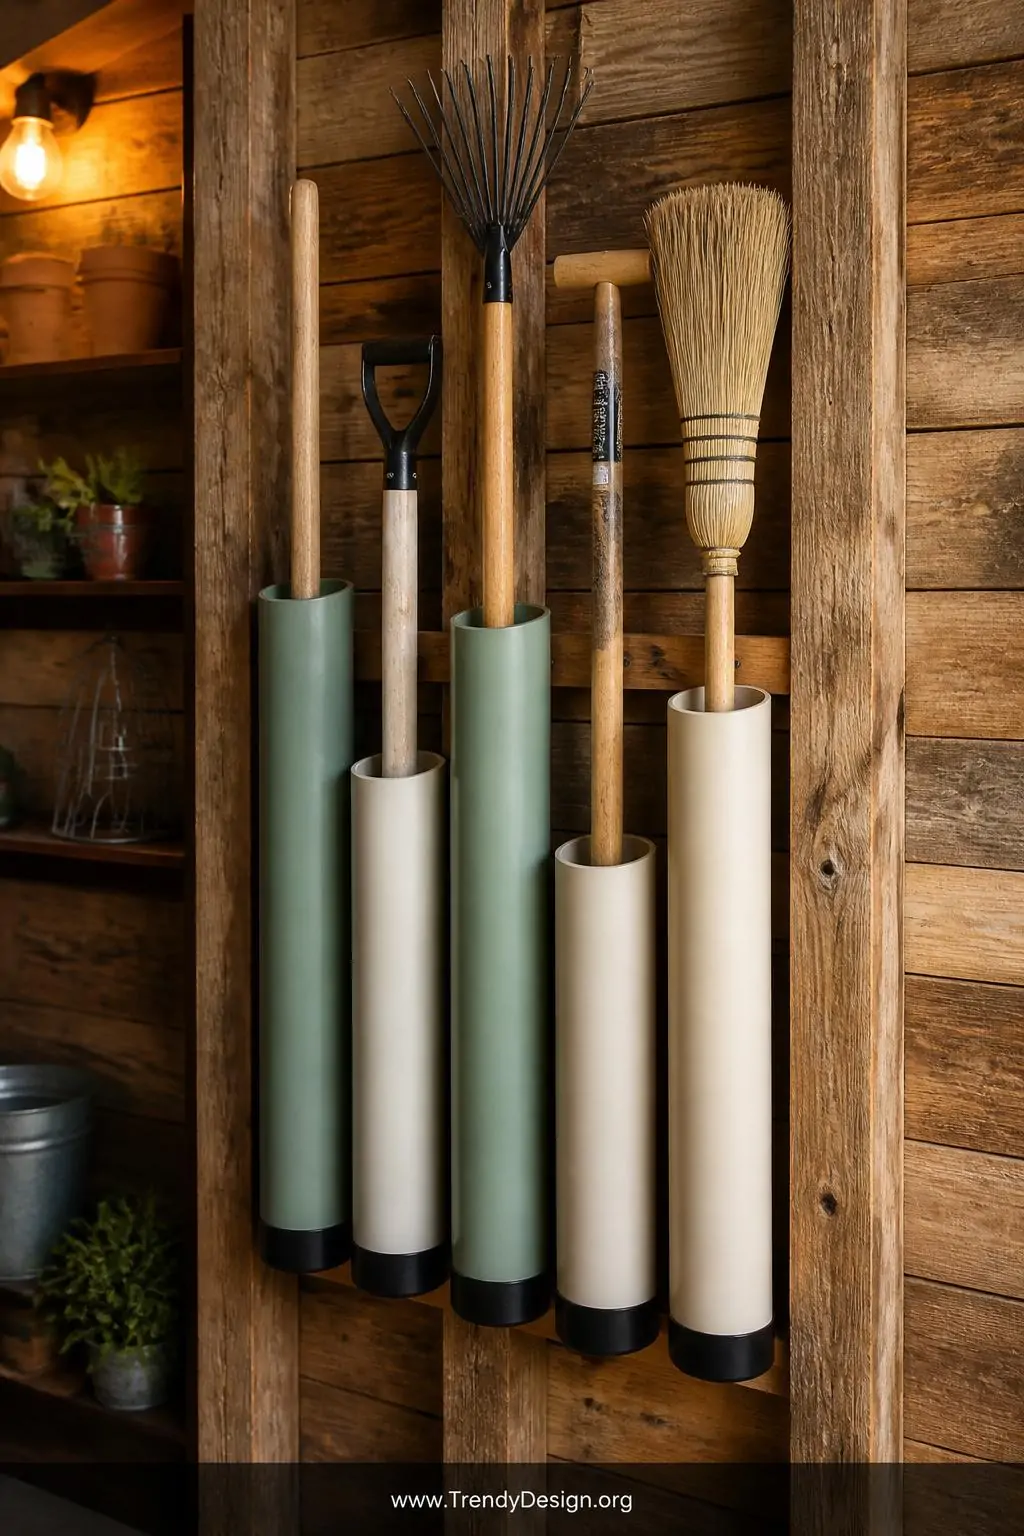
Here’s a budget-friendly gem that takes about an hour and costs next to nothing. Cut sections of PVC pipe to different lengths, bundle or mount them together, and you’ve got individual slots for long-handled tools like shovels, rakes, and brooms. Each tool gets its own dedicated home, and nothing can topple over or get tangled with its neighbors.
- Use larger diameter pipe for bulkier handles
- Mount the bundle vertically on a wall or secure it in a wooden frame
- Paint the pipes to match your shed’s interior for a polished look
- Add caps on the bottom ends to keep dirt and critters out
This is one of those garden tool storage ideas that looks like it came from a Pinterest board but genuinely costs under ten dollars to make. Your future self will be very grateful.
3. Repurpose a Wooden Pallet as a Wall Organizer
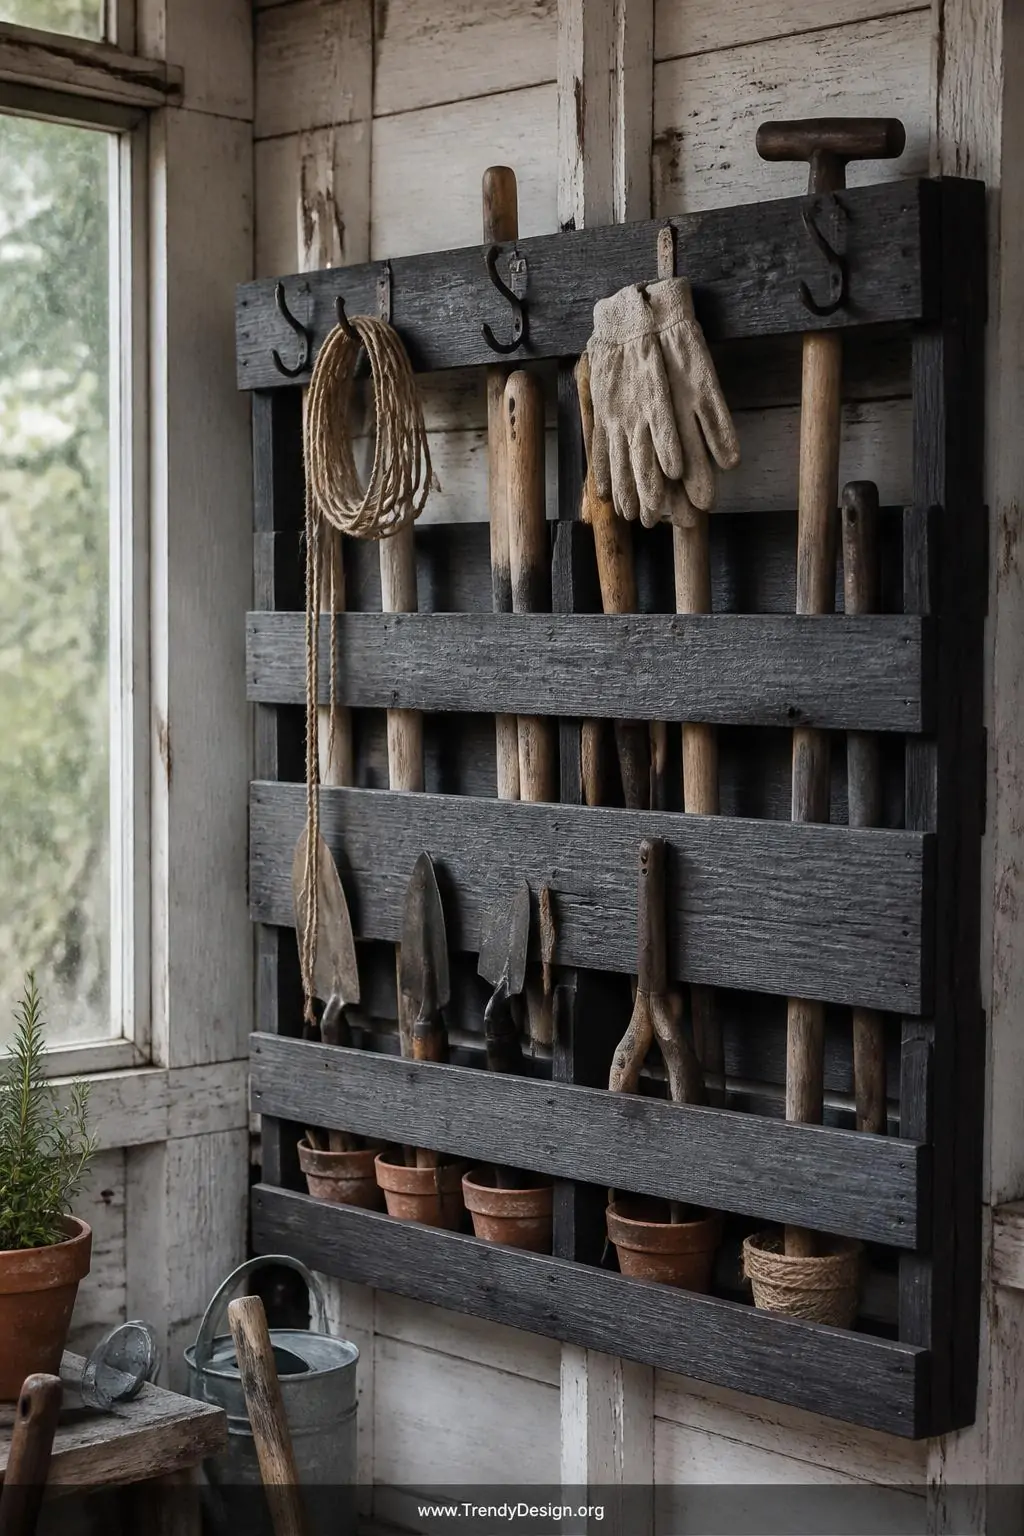
Old wooden pallets are basically free real estate just waiting to be transformed. Mount one flat against your shed wall and suddenly you have built-in gaps for slipping in tool handles, a surface for adding hooks, and even space to tuck in small hand tools. The rustic look is a bonus that gives your shed that charming farmhouse aesthetic without any extra effort.
Sand the edges lightly so you don’t end up with splinters during your reach-and-grab moments. You can leave the wood natural or give it a coat of weatherproof paint if you want it to last through humid summers and cold winters. IMO, this is the most stylish low-effort storage upgrade you can make.
4. Use a Magnetic Strip for Small Metal Tools
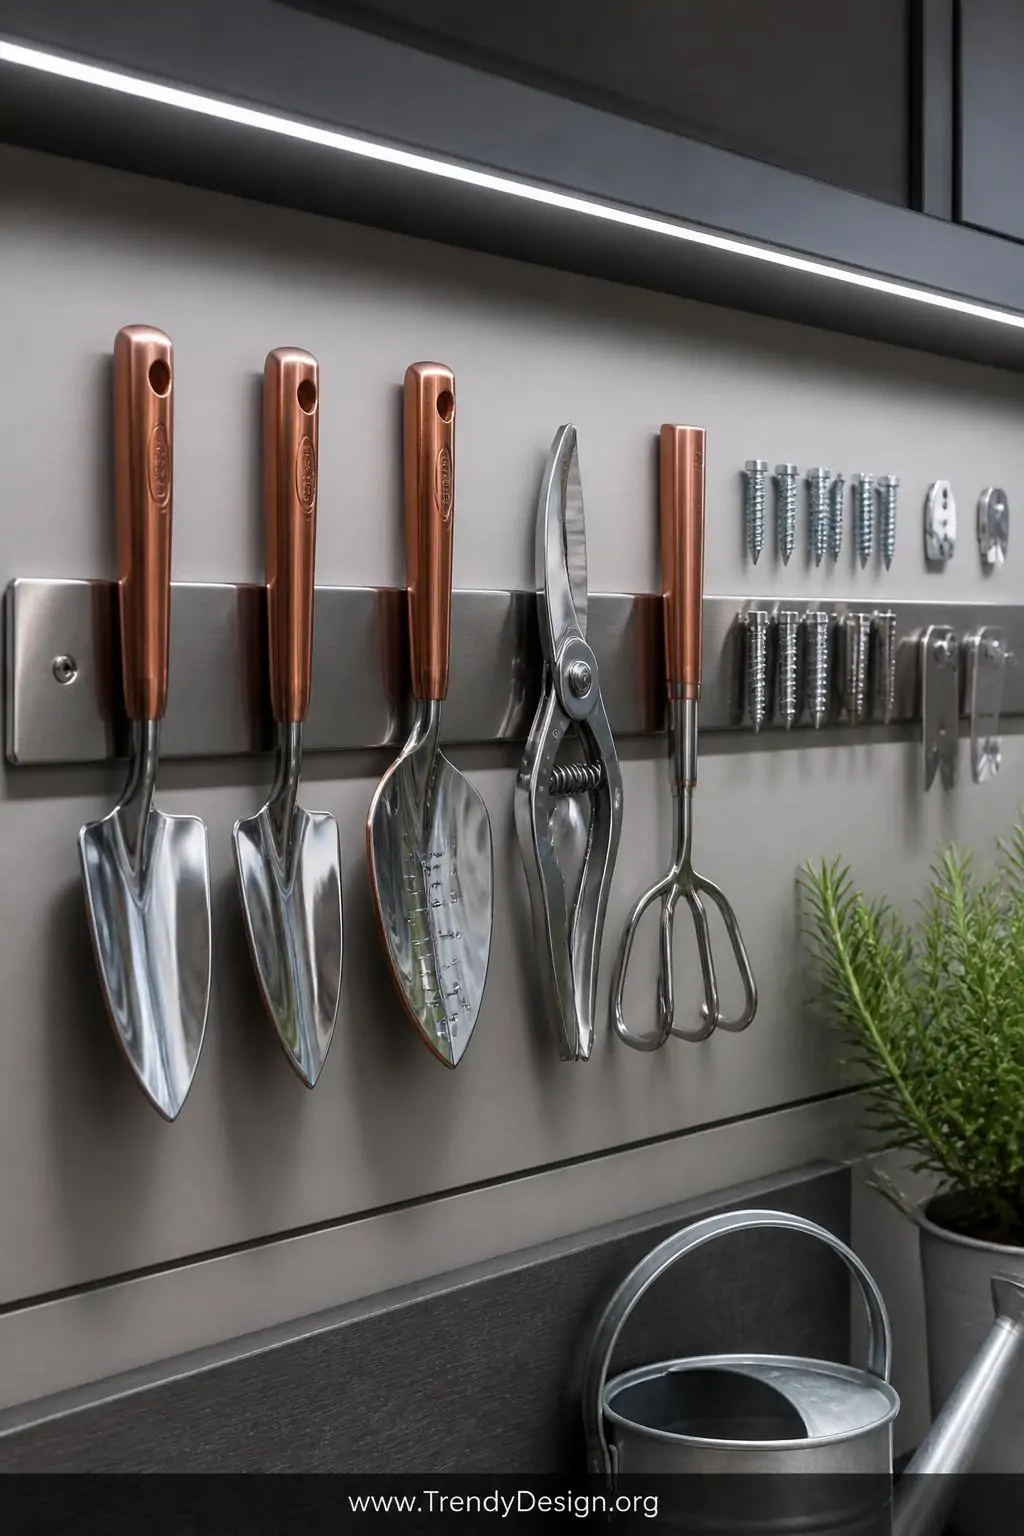
Those tiny hand tools the ones that always seem to vanish into thin air deserve their own special home. A heavy-duty magnetic strip mounted at eye level keeps trowels, pruning snips, small cultivators, and even spare screws right where you can see them. No more rummaging through a jumbled drawer hoping to find the right size.
Magnetic strips are typically sold for kitchens, but they work just as beautifully in a shed. Mount one near your main work area for the tools you reach for every single day. You’ll feel like a professional gardener with a perfectly curated toolkit every time you walk in.
5. Hang a Shoe Organizer for Small Supplies

Don’t overlook the humble over-the-door shoe organizer it’s one of the most underrated garden tool storage ideas out there. Hang one on the back of your shed door and suddenly you have dozens of pockets ready to hold seed packets, gardening gloves, plant labels, spray bottles, and small hand tools. It transforms completely unused space into a fully functional storage zone.
- Choose a clear pocket organizer so you can see contents at a glance
- Label each pocket by category to keep things consistent
- Use the lower pockets for heavier items to prevent sagging
- Replace it at the end of the season if pockets start to wear out
6. Create a Garden Hose Station with a Wall-Mounted Reel
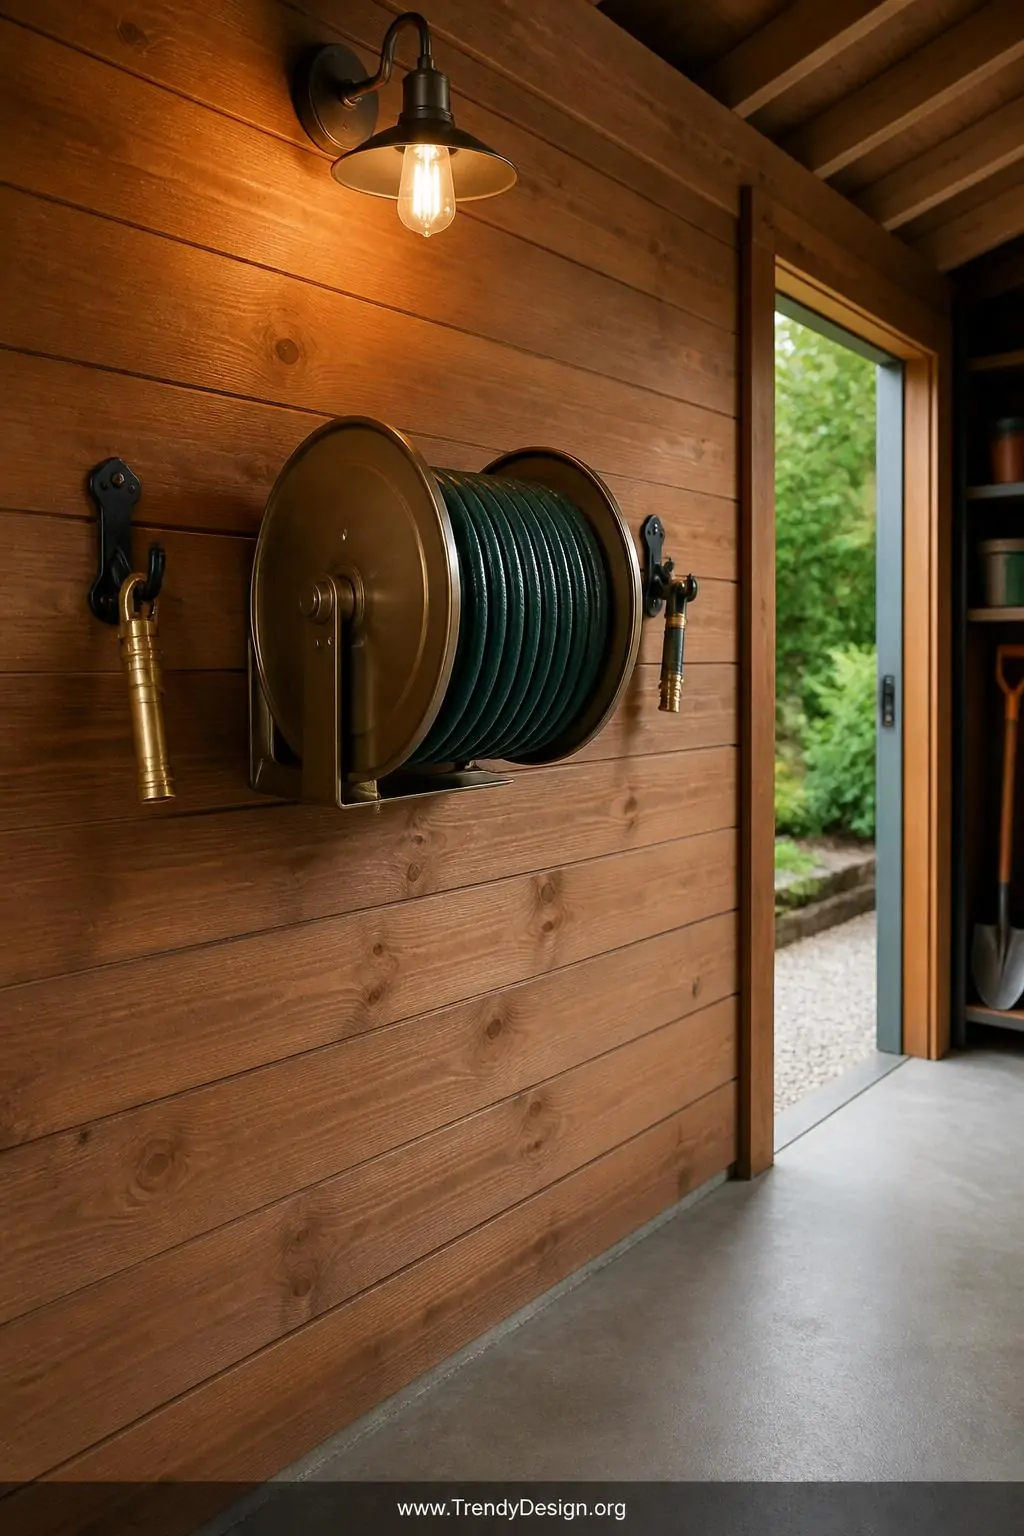
Raise your hand if you’ve tripped over a coiled hose at least once this summer. A wall-mounted hose reel is a game-changer because it keeps your hose neat, prevents kinking, and frees up a surprising amount of floor space in the process. You can find wall-mount reels in basic metal versions or decorative styles that actually look intentional.
Position it near the door for easy access and make sure to drain the hose completely before rolling it up at the end of each use. Bonus tip: add a small hooks nearby for hanging nozzle attachments so the whole setup stays beautifully contained. This single change can make your shed feel dramatically more spacious.
7. Set Up a Freestanding Tool Rack for Heavy Equipment
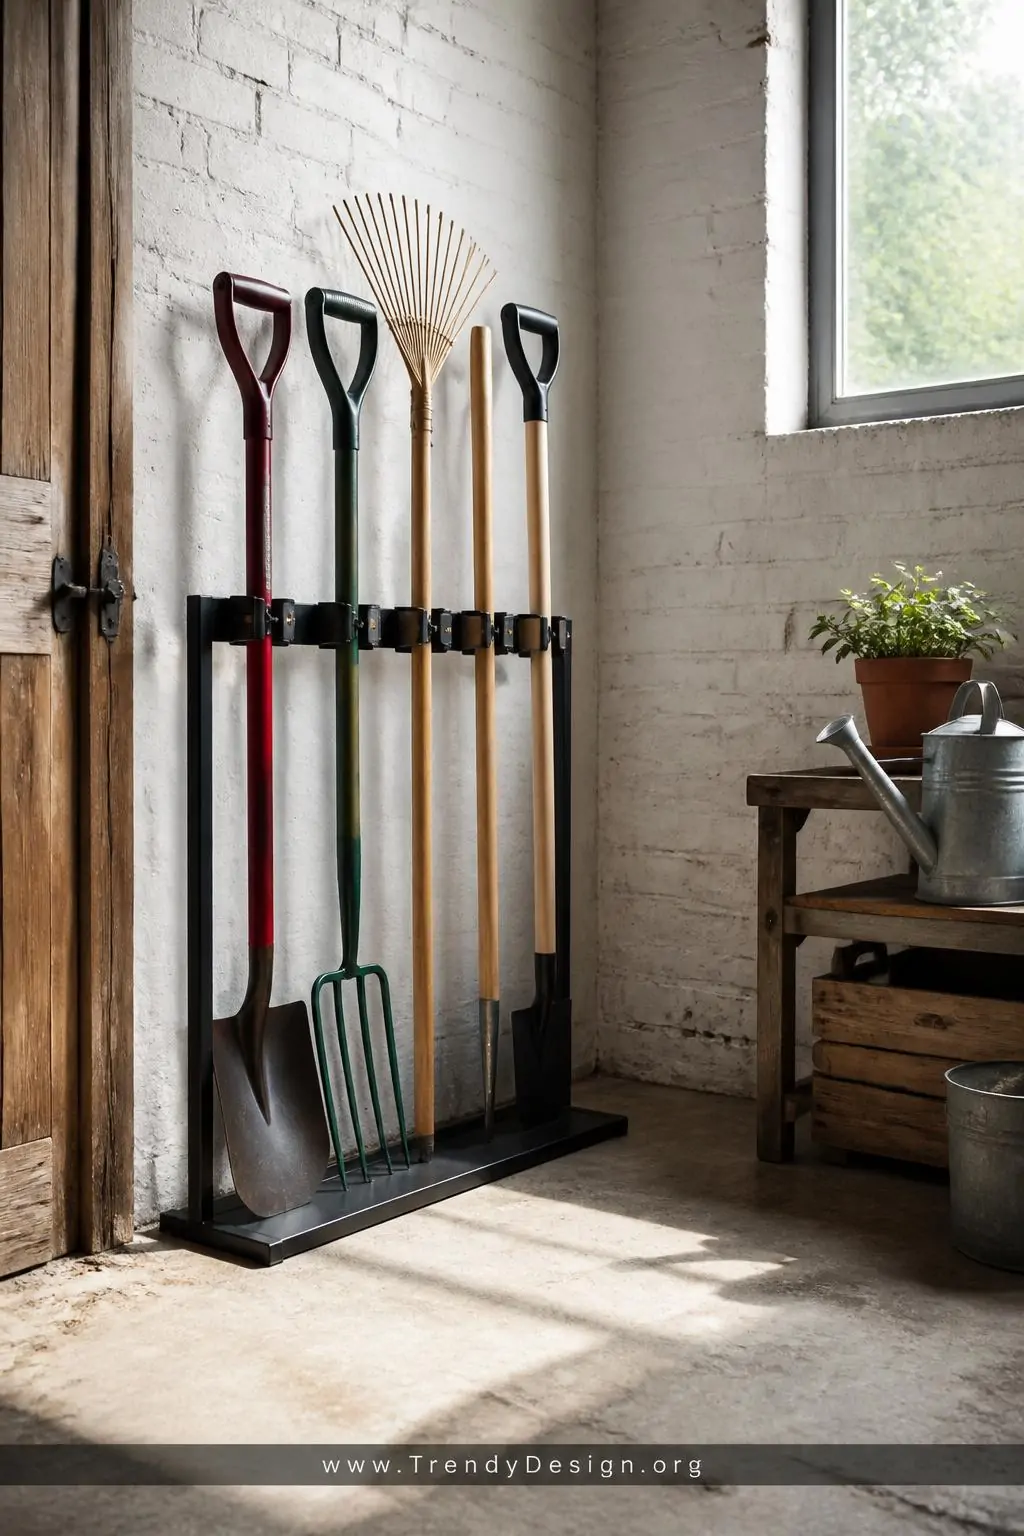
Not every shed has wall space to spare, and that’s completely okay. A freestanding upright tool rack can hold multiple long-handled tools without requiring a single hole in the wall. These racks come in metal and wood varieties and typically hold anywhere from five to fifteen tools depending on the design.
What to Look for in a Good Tool Rack
- Rubber grips or coated slots that won’t scratch tool handles
- A wide, stable base that won’t tip over if bumped
- Enough capacity to hold your most-used collection
- Weather-resistant materials if it lives near a window or door
Place your tool rack in a corner or along a clear wall section for maximum efficiency. It’s also portable, which is great if you rearrange your shed layout between seasons.
8. Label Everything with Weatherproof Tags
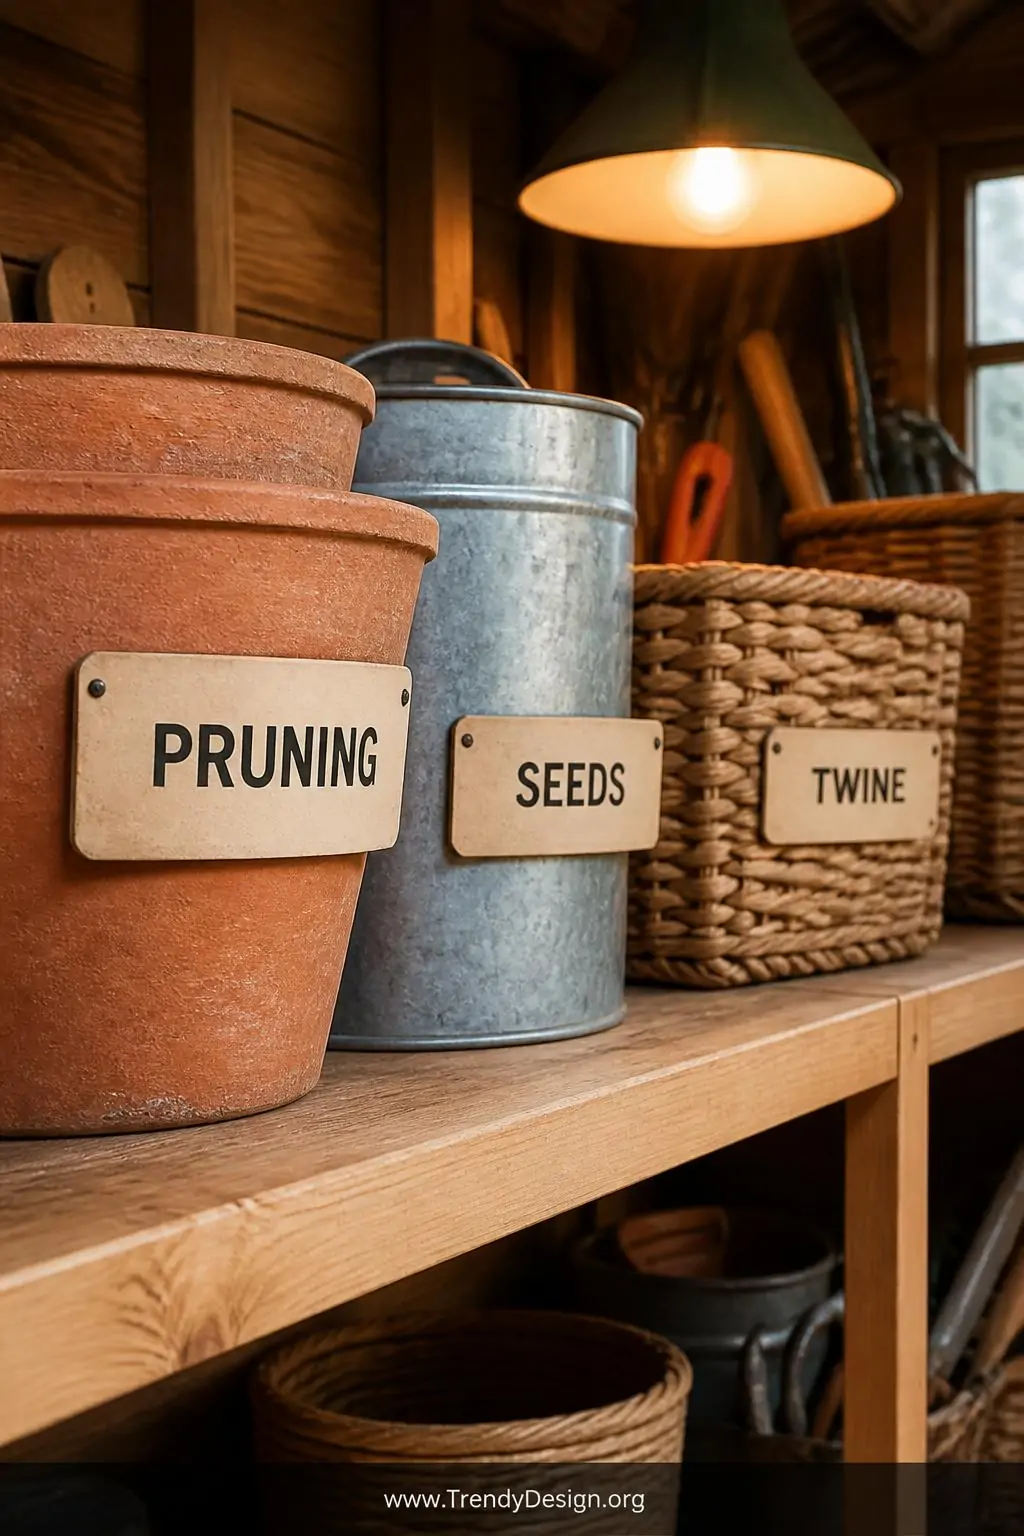
Here’s the secret ingredient that makes every other storage system actually work: labels. You can have the most beautifully organized shed in the neighborhood, but if family members or helpers don’t know where things go back, the whole system falls apart within a week. Weatherproof labels take five minutes to make and save hours of frustration over the course of a season.
Use a label maker with waterproof tape or write directly on laminated card stock with a permanent marker. Label shelves, bins, hooks, and buckets with simple descriptive names. Honestly, there’s something deeply satisfying about walking into a labeled, organized shed it genuinely makes you want to go outside and garden more.
9. Dedicate a Shelf Zone for Seasonal Tool Rotation
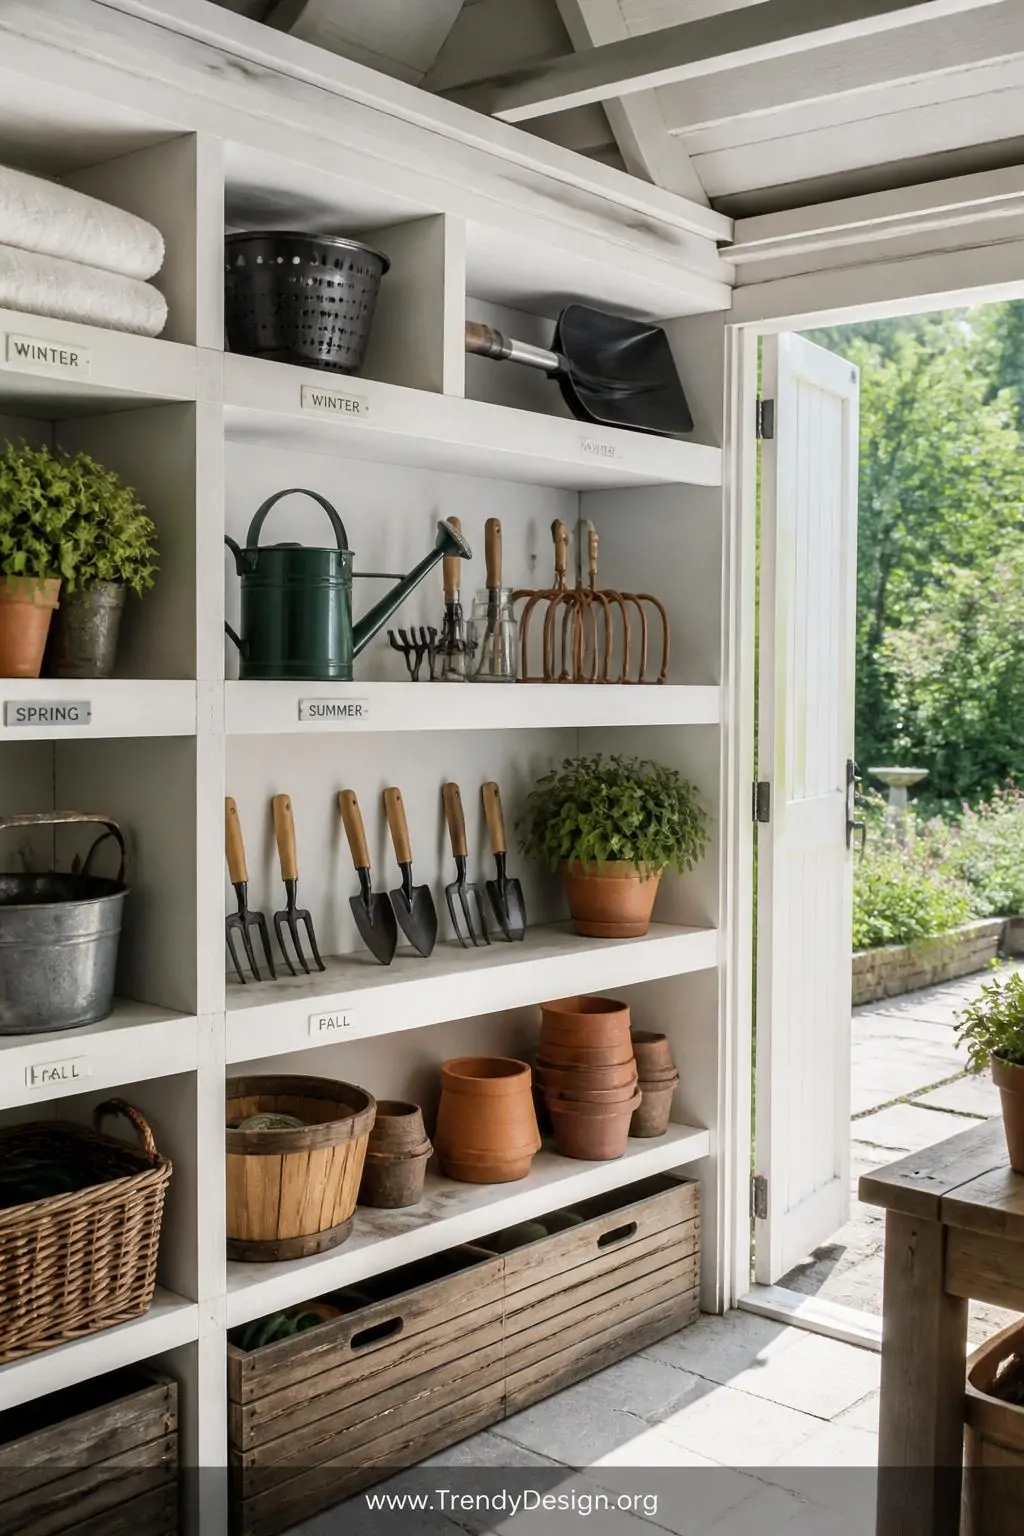
Smart garden tool storage ideas aren’t just about where you put things they’re about how you rotate things throughout the year. Dedicate one shelf specifically for seasonal tools so you’re not moving around winter gear to grab your summer pruners in July. Rotate the shelf contents at the beginning of each season, moving inactive tools to higher or less accessible spots.
Spring and summer tools like cultivators, hand rakes, and watering cans should live at eye level and arm’s reach. Fall and winter gear frost cloths, bulb planters, snow shovels can shift to higher shelves until they’re needed again. This simple rotation habit keeps your shed feeling fresh and functional without any major reorganization efforts.
Wrap It All Up and Enjoy Your Space
Keeping your shed organized doesn’t require a massive renovation budget or a full weekend of work. A few targeted upgrades whether that’s a pegboard, a magnetic strip, or a simple seasonal rotation system make a remarkable difference in how your space functions from day to day. When your tools are easy to find and easy to put back, you’ll actually spend more time in the garden instead of hunting through the clutter.
Pick two or three of these garden tool storage ideas that feel most doable right now and start there. Your shed, your tools, and your Saturday mornings will thank you for it.
Leave a Reply