Your sewing supplies are everywhere fabric on the floor, thread tangled in a drawer, scissors missing in action. Sound familiar? These sewing closet organizer ideas will turn that chaotic craft corner into a space you actually want to spend time in.
1. Use a Pegboard Wall to Hang Everything in Sight
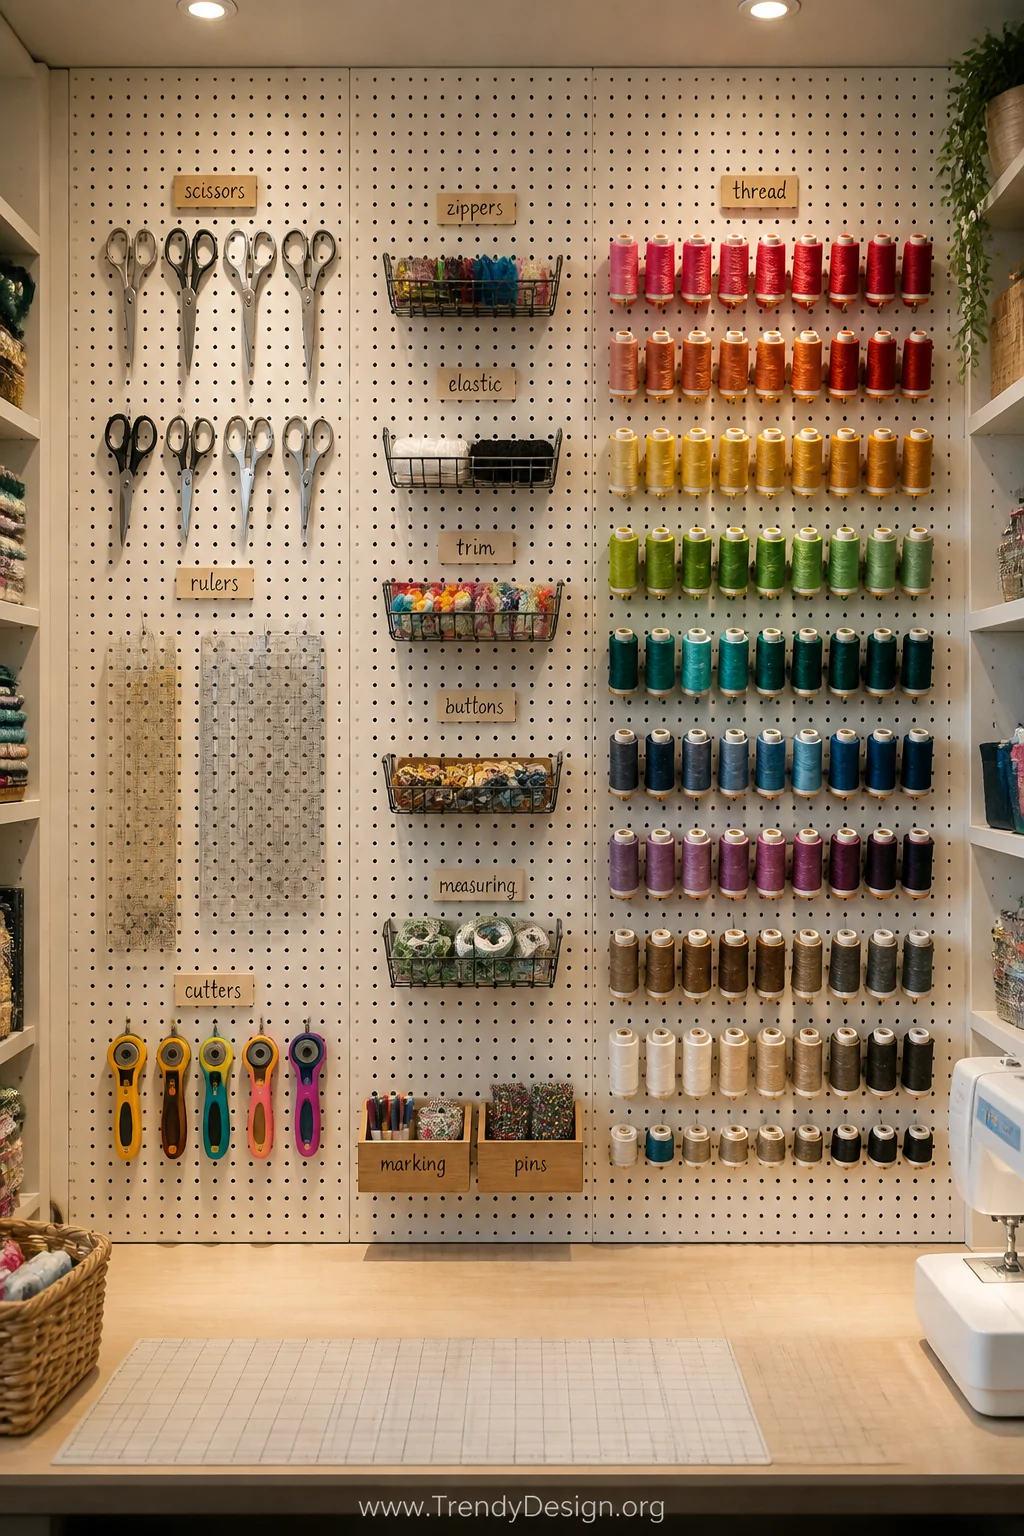
Pegboards are the ultimate game-changer for any sewing closet organization setup. You can hang scissors, rulers, thread spools, and even small baskets all visible, all accessible, all gloriously tidy.
Mount one pegboard on the back wall of your closet and watch your productivity skyrocket. Add hooks, shelves, and bins in whatever configuration works for your supplies.
- Use color-coded hooks to separate tool categories
- Label each section so everything has a permanent home
- Leave empty pegs for future tool purchases
The beauty here is flexibility rearrange anytime your workflow changes without any major renovation drama.
2. Install Tiered Shelving for Fabric Storage
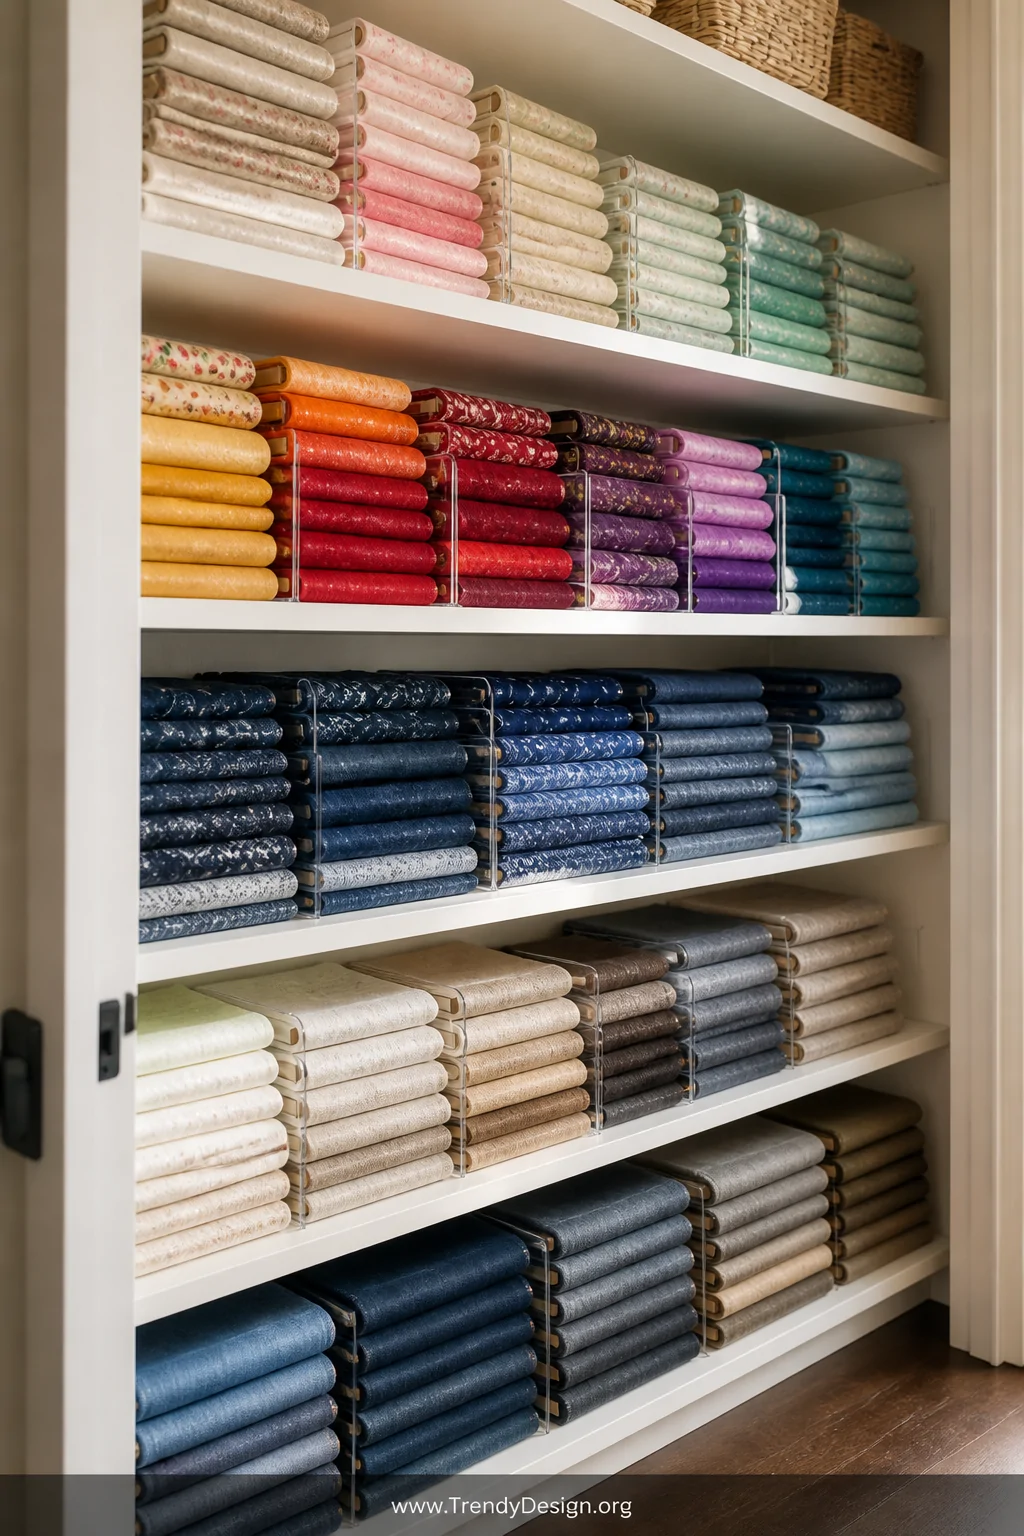
Fabric is the hardest thing to store neatly, and an unorganized pile turns into a avalanche faster than you can say “rotary cutter.” Tiered shelving lets you fold and display fabric like a mini fabric store right inside your closet.
Stack shelves from floor to ceiling and organize fabric by color, weight, or project type. Seeing your collection displayed beautifully is seriously motivating you’ll actually want to start new projects.
- Fold fabric around comic book boards for neat, uniform stacks
- Store heavier fabric on lower shelves for easier access
- Use clear shelf dividers to prevent fabric avalanches
3. Repurpose a Shoe Organizer for Thread and Notions
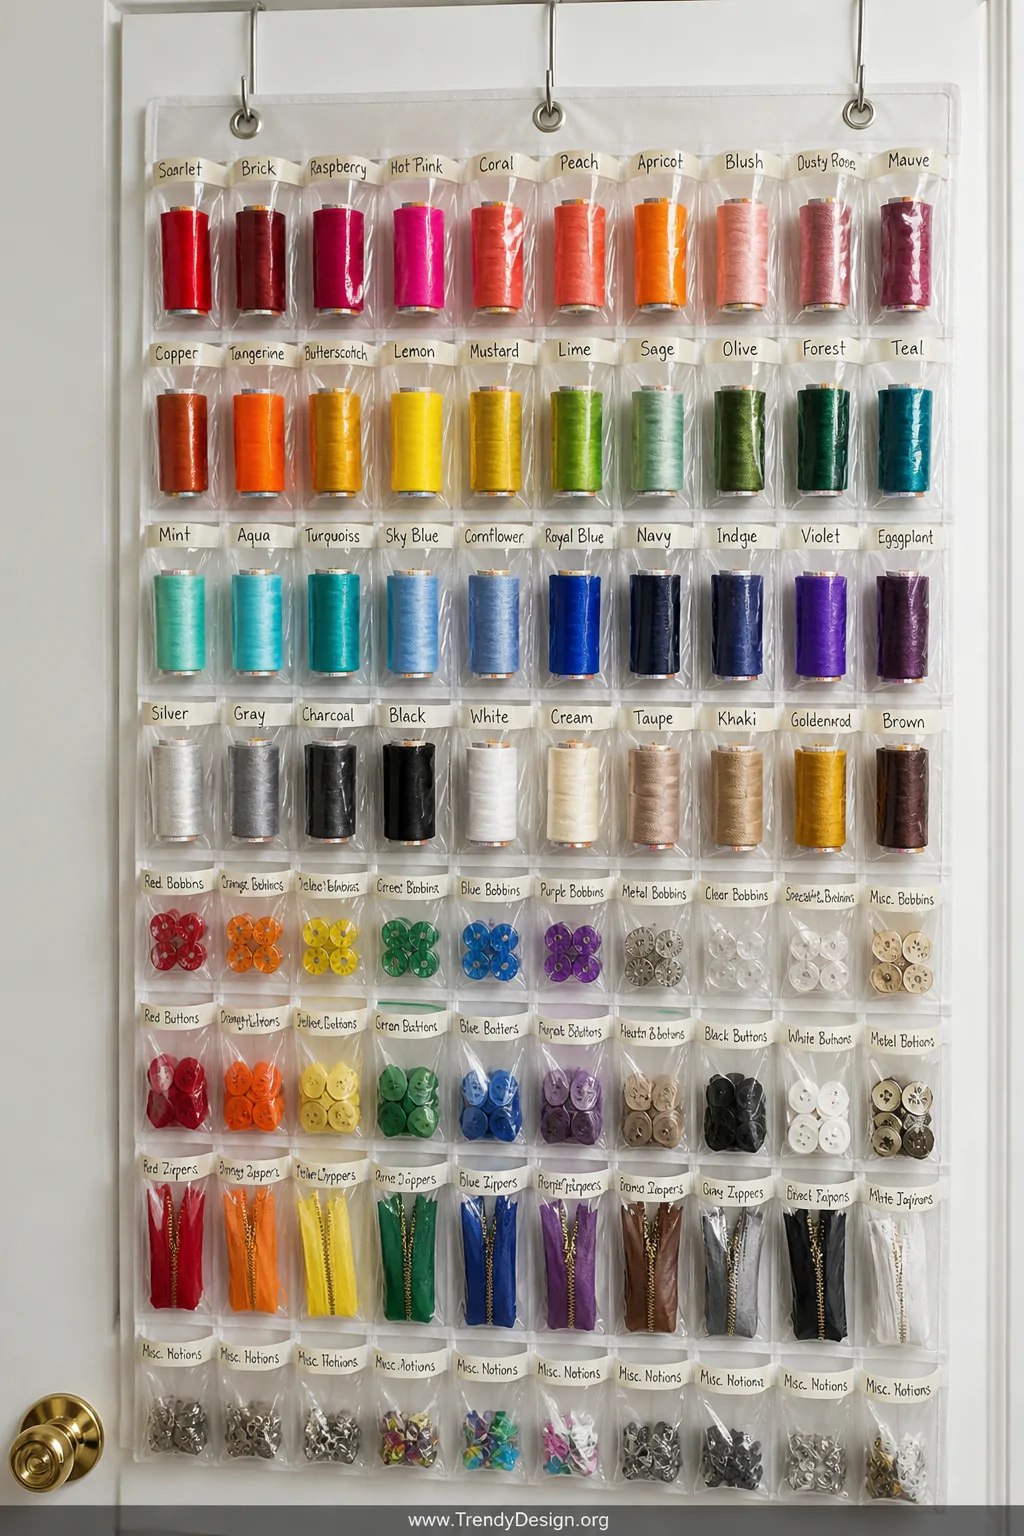
Honestly, a hanging shoe organizer might be the most underrated sewing closet organizer trick out there. Those little pockets are literally made for spools of thread, bobbins, zippers, and buttons.
Hang one on the back of your closet door and instantly multiply your storage without sacrificing any floor or shelf space. Each pocket holds a different category of notions, so finding what you need takes seconds instead of a full excavation mission.
- Dedicate one row entirely to thread organized by color
- Use larger pockets for interfacing or pattern pieces
- Add a small label strip along the top of each pocket
4. Create a Dedicated Cutting Station at Counter Height
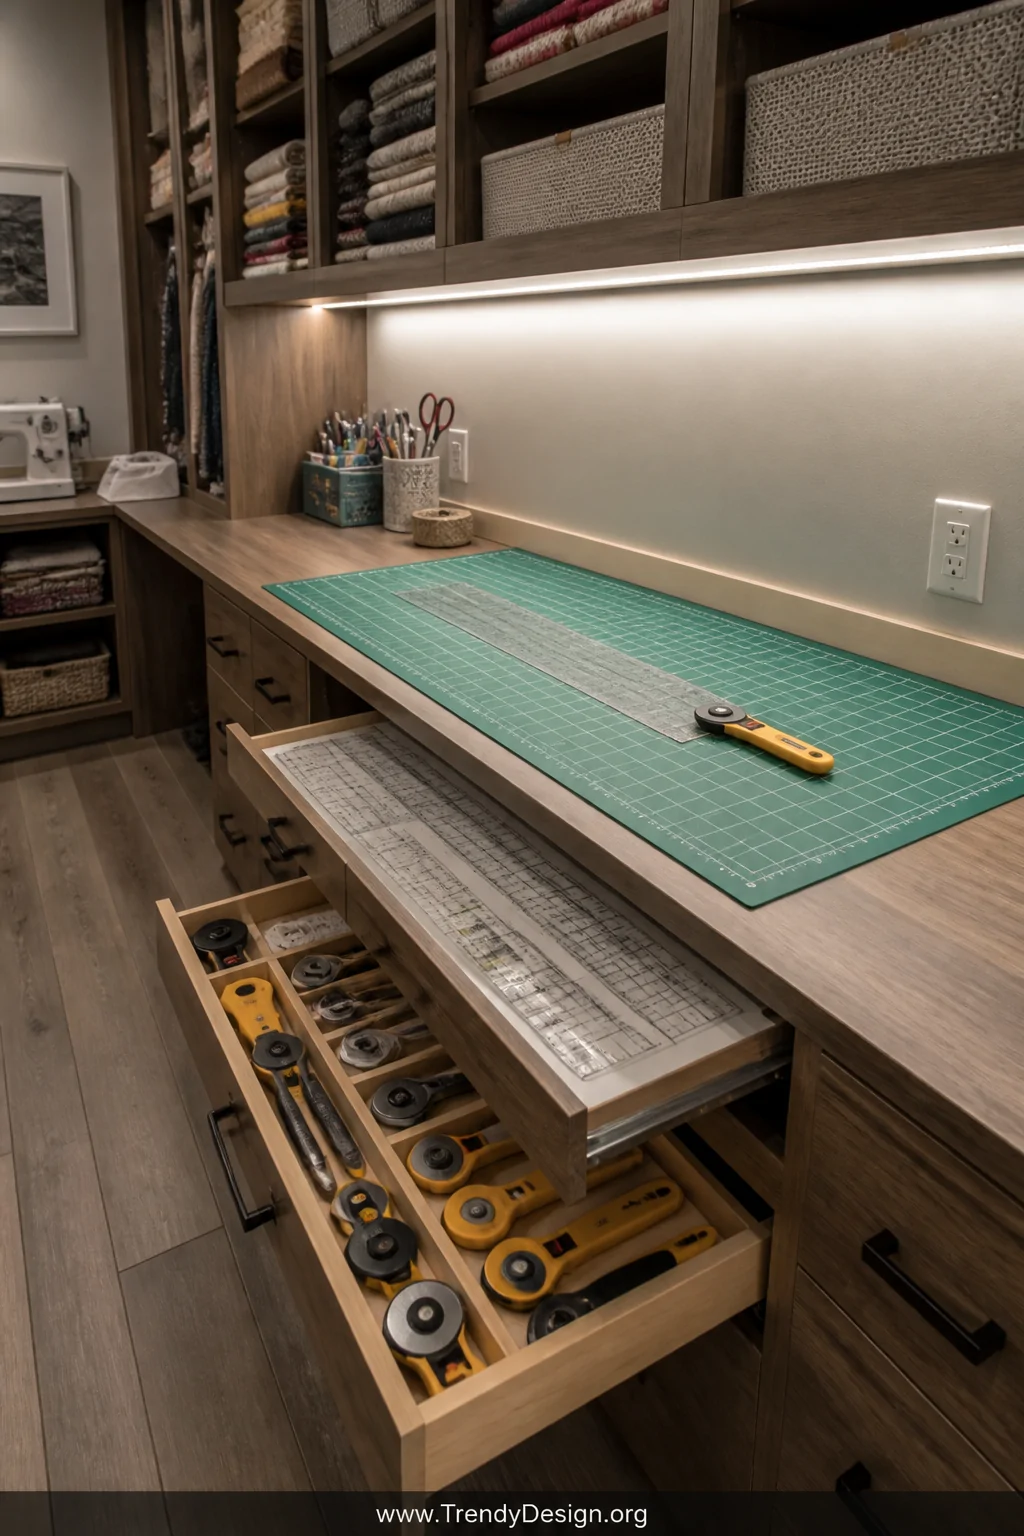
Nothing slows down a sewing project like having nowhere flat and comfortable to cut. A built-in counter at the right height transforms your closet into a fully functional sewing workspace organizer that keeps your back happy too.
Install a countertop along one wall at approximately 36 inches high perfect for standing and cutting without hunching over. Add pull-out drawers underneath for storing rulers, rotary cutters, and cutting mats.
IMO, this single upgrade makes a sewing closet feel like a professional studio rather than a cramped craft corner. If your closet is deep enough, this is absolutely worth the investment.
5. Sort Thread on a Mounted Spool Rack
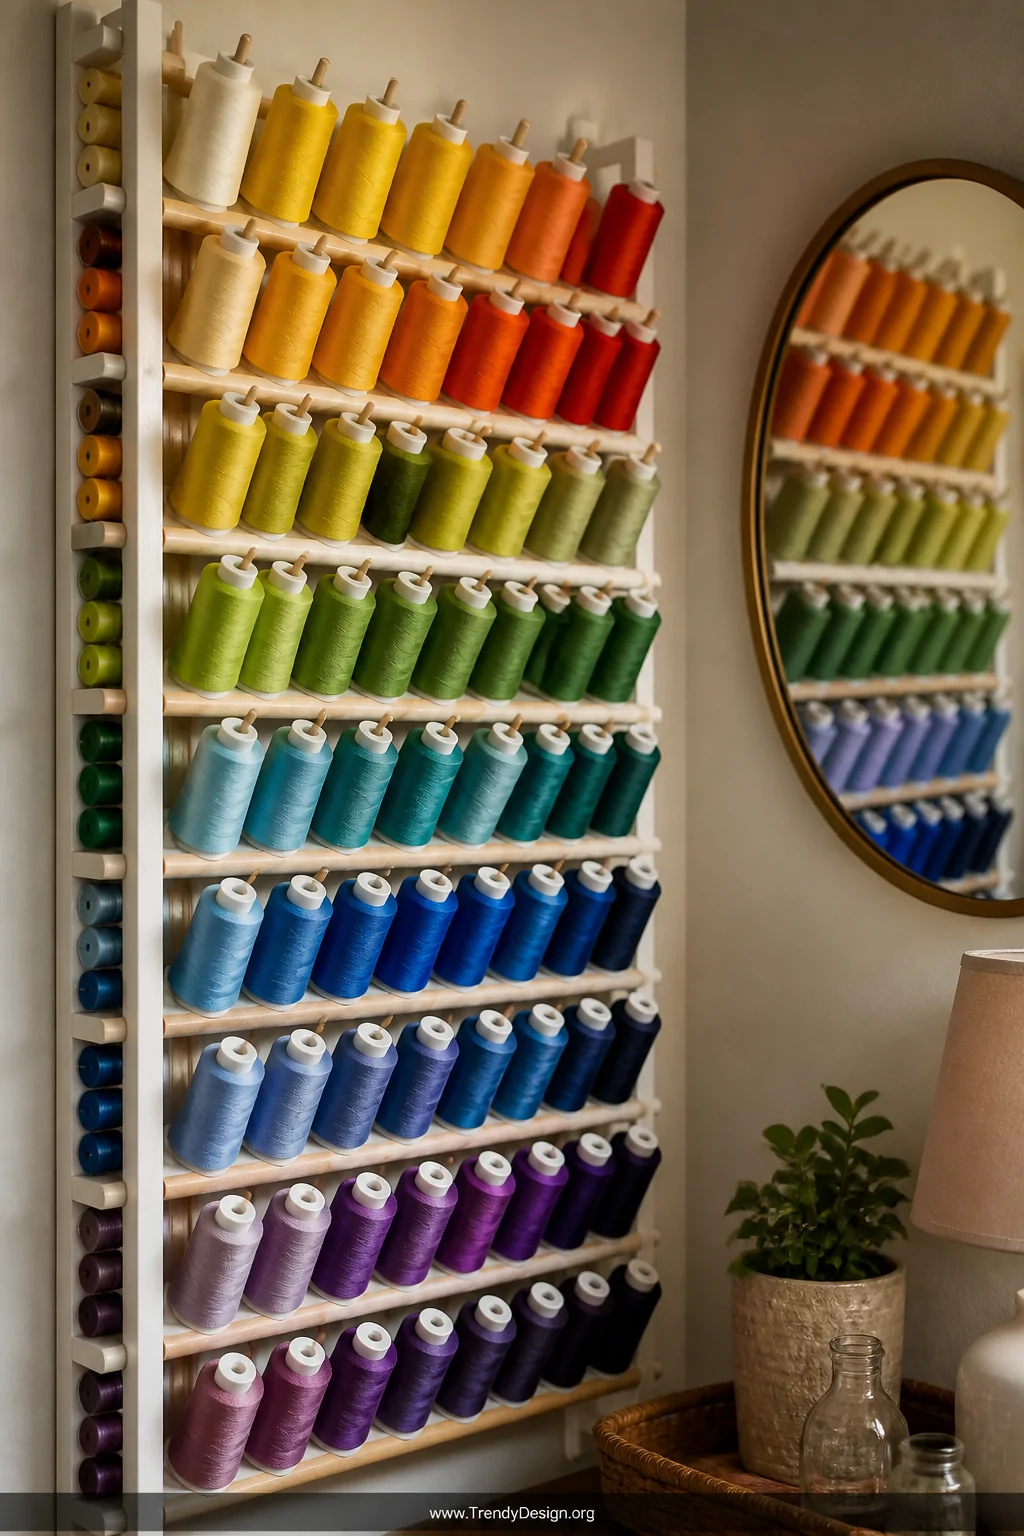
Loose thread spools rolling around a drawer is basically a sewing room villain. A mounted thread spool rack keeps every color visible, untangled, and ready to grab the moment inspiration strikes.
Mount a spool rack directly on the wall or inside a cabinet door to save precious shelf real estate. Organize spools by color family so you can find the perfect match at a glance no more digging through a jumbled thread graveyard.
- DIY a spool rack using wooden dowels and a painted board
- Use a spice rack as a budget-friendly alternative
- Store matching bobbin thread directly behind each spool
- Add a small mirror nearby to check color accuracy in proper lighting
6. Use Clear Bins and Labels for Small Notions
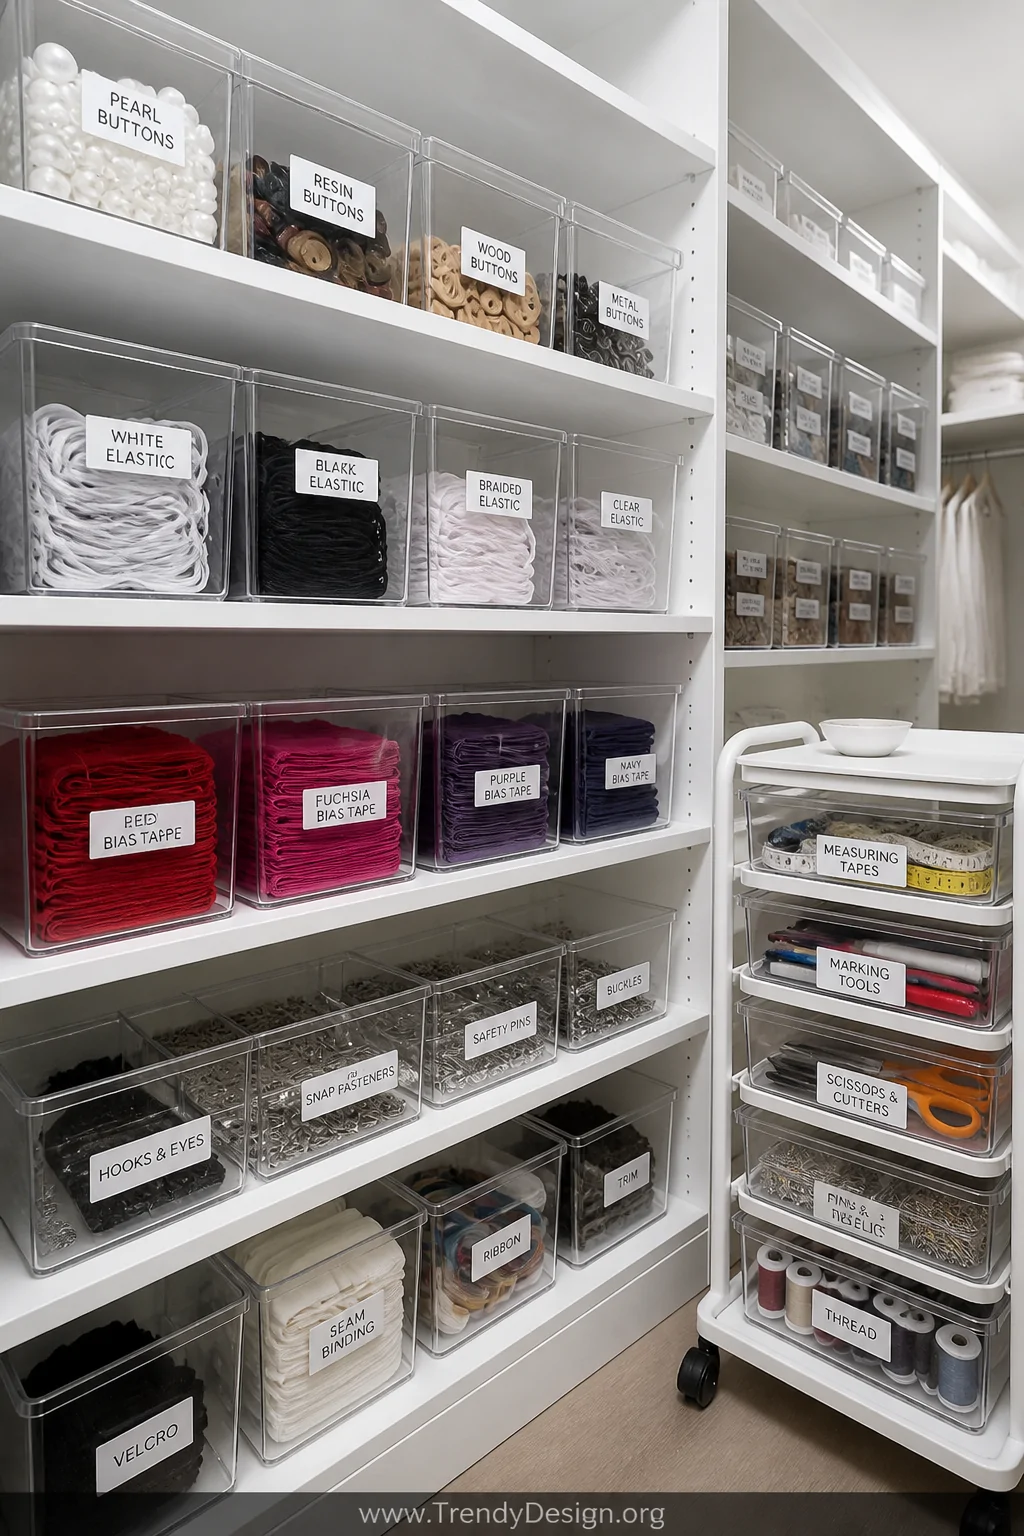
Buttons, snaps, elastic, bias tape these tiny notions disappear faster than matching socks in a dryer. Clear bins with labels are the non-negotiable foundation of any seriously organized sewing closet storage system.
Stack them on shelves, line them inside drawers, or arrange them inside a rolling cart you can wheel wherever you’re working. When you can see exactly what you have, you stop buying duplicates and start actually using what’s in your stash.
Best Container Options for Notions
- Small square bins perfect for buttons, beads, and snaps
- Stackable rectangle containers great for elastic, ribbon, and trim
- Divided tackle boxes ideal for tiny notions like hooks and eyes
FYI, spending an afternoon labeling everything is the most satisfying project you’ll do all month it genuinely pays off every single sewing session after.
7. Add a Rolling Cart for In-Progress Projects
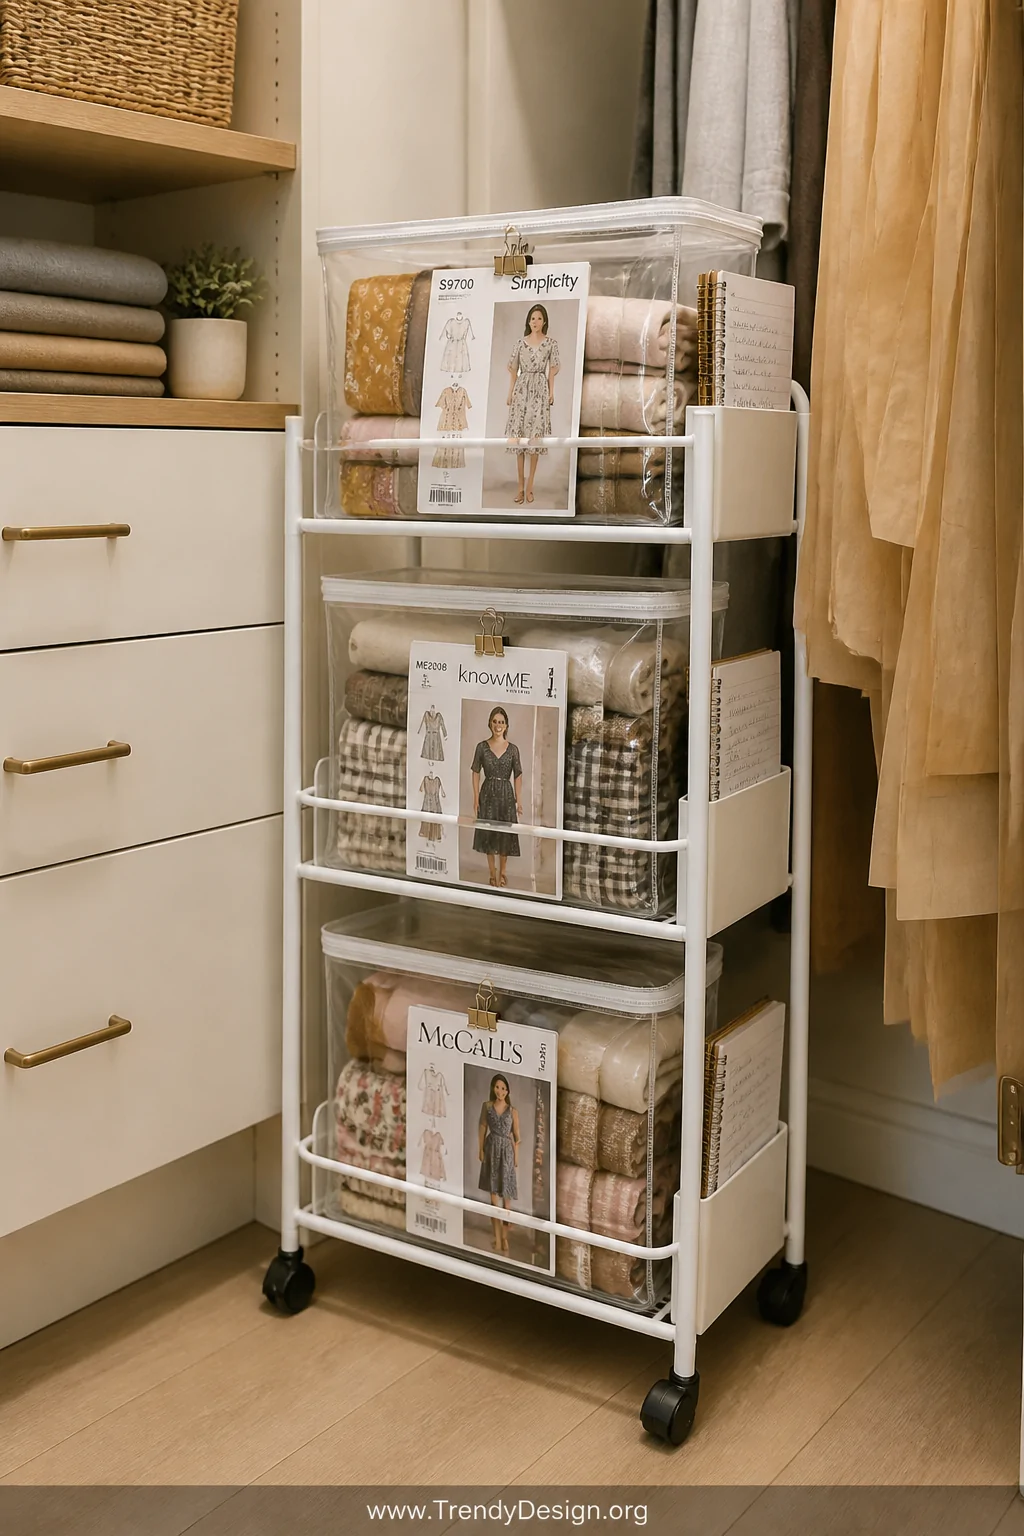
Every sewist has that one (or five) projects living in a perpetual state of “almost done.” A rolling cart dedicated entirely to in-progress sewing projects keeps work-in-progress pieces contained and ready to grab without disturbing the rest of your organized closet.
Use different tiers for different projects one shelf per project bag with all relevant fabric, pattern pieces, and notions stored together. Roll it out when you’re working, tuck it back into the closet corner when you’re done.
- Use zip bags inside each tier to keep project components together
- Clip the pattern envelope to the outside of each bag
- Add a small notepad slot for writing down where you left off
This system is especially brilliant if you sew in short bursts and need to pick up exactly where you left off without any frustrating reorganizing.
8. Maximize the Closet Door with Multi-Purpose Organizers
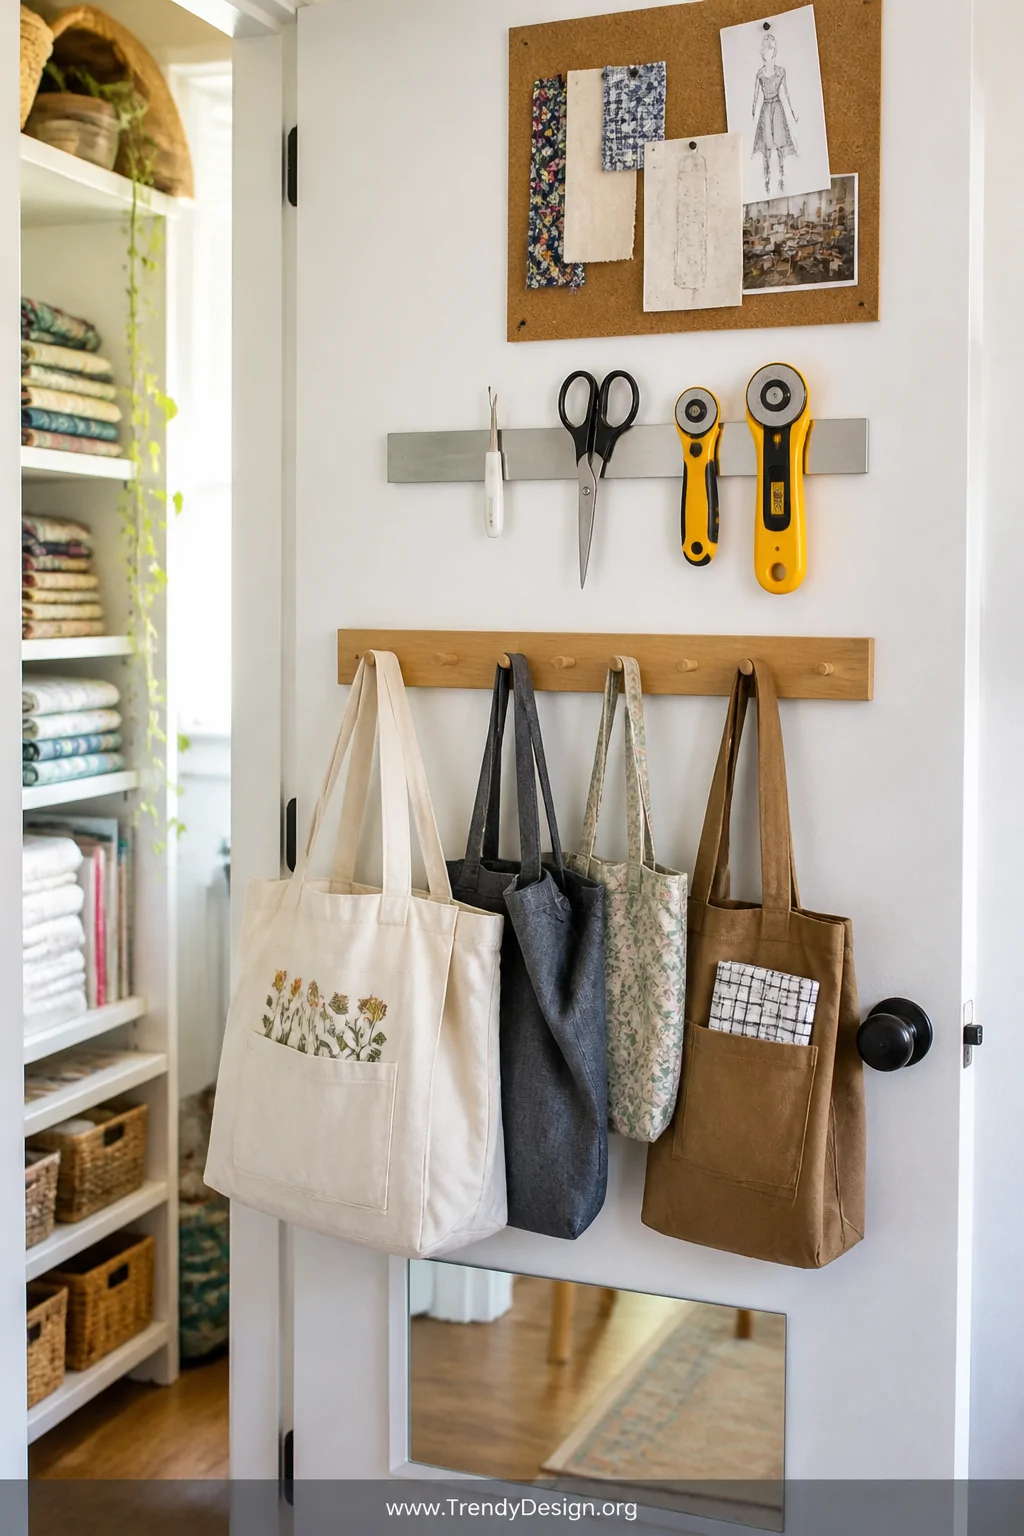
The back of your closet door is prime real estate you’re probably completely ignoring right now. Door-mounted organizers add serious storage capacity to a sewing closet without touching a single shelf or floor space.
Mount a combination of hooks, magnetic strips, and pocket organizers to create a truly multi-functional storage wall. Magnetic strips work brilliantly for keeping scissors, seam rippers, and other metal tools exactly where you need them.
- Hang a small corkboard for pattern notes and inspiration photos
- Add a magnetic strip at eye level for all metal cutting tools
- Use an over-door hook rack for storing tote bags of fabric
- Mount a small mirror for checking drape and fit without leaving the room
Every inch of that door is usable space just waiting to work harder for you don’t let it go to waste.
Your Dream Sewing Closet Is Closer Than You Think
Transforming a chaotic sewing space doesn’t require a complete renovation or an unlimited budget. Start with one of these sewing closet organizer ideas, get comfortable with that system, then tackle the next one. Small, intentional changes stack up quickly into a space that genuinely supports your creativity and makes every sewing session something you look forward to. You deserve a workspace that works as hard as you do go make it happen.
“`
Leave a Reply