Your nature walks deserve better than a blurry phone gallery that you’ll never actually look at again. A nature scrapbook turns those outdoor adventures into something you’ll actually want to show people. Ready to get started? Here are eight ideas that’ll make your pages absolutely stunning.
1. Press and Mount Wildflowers Like a Botanical Artist
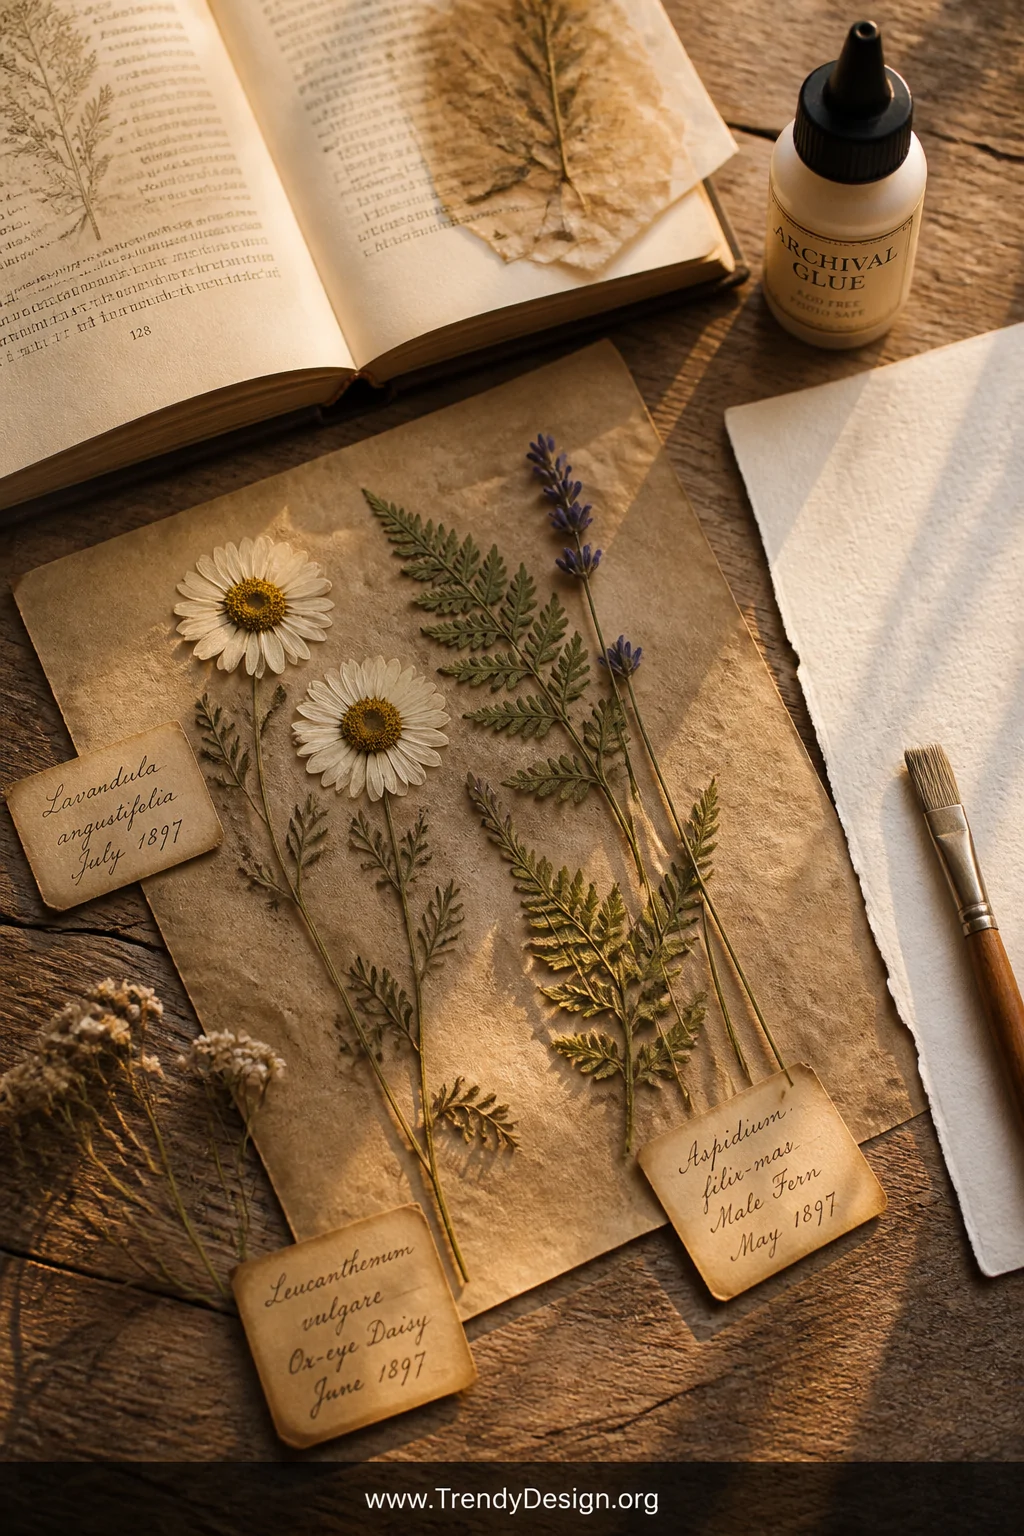
Pressing flowers is probably the oldest trick in the book, but honestly, it never gets old. Grab a heavy hardcover book, layer your blooms between parchment paper, and wait about two weeks for flat, gorgeous results.
Once pressed, arrange them on kraft paper or watercolor backgrounds and secure them with archival-quality glue so they last for decades. Add a tiny handwritten label with the flower’s name and where you found it that personal detail makes ALL the difference.
- Use daisies, lavender, and ferns for the most reliable pressing results
- Spray finished pages with a UV-protective sealant to prevent fading
- Layer multiple flowers at different angles for a magazine-worthy layout
2. Create Leaf Rubbings With Texture and Color
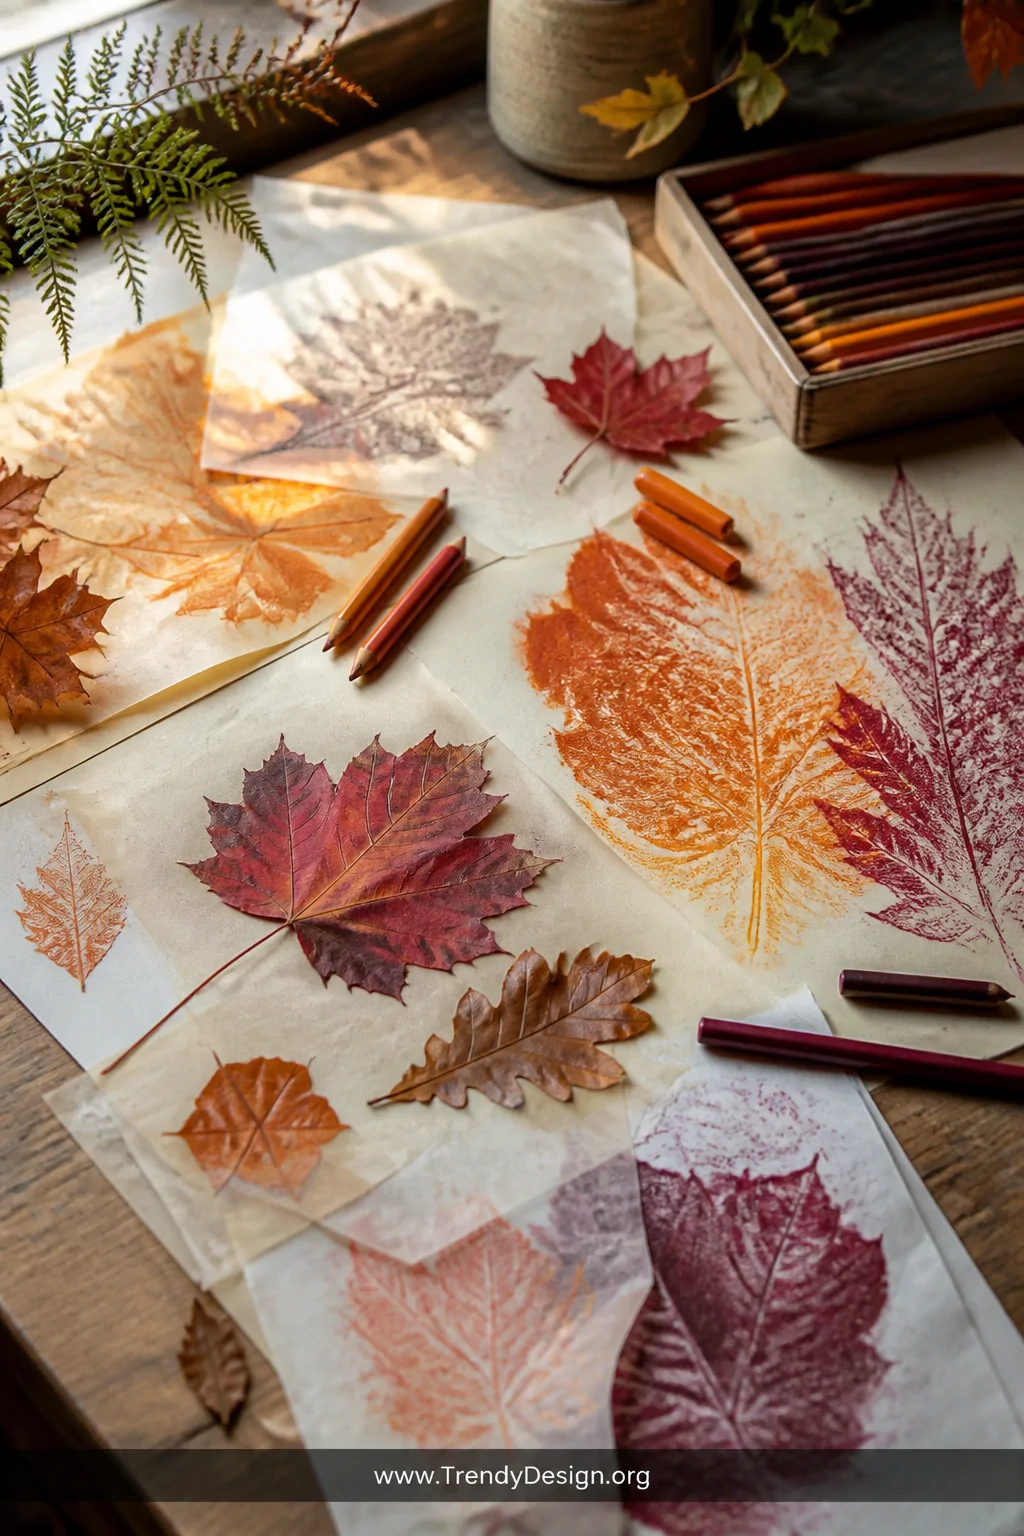
Remember doing leaf rubbings in elementary school? Well, grown-up you is about to do it way better. Place a leaf vein-side up under your scrapbook paper, then rub the flat side of a colored pencil or crayon across the surface to reveal that gorgeous detailed texture.
Leaf rubbings work beautifully when you layer multiple leaves and use an ombre color technique think warm oranges fading into deep burgundy for fall pages. It looks like you spent hours on it. You didn’t. Your secret is safe.
3. Build a Seed and Specimen Collection Page
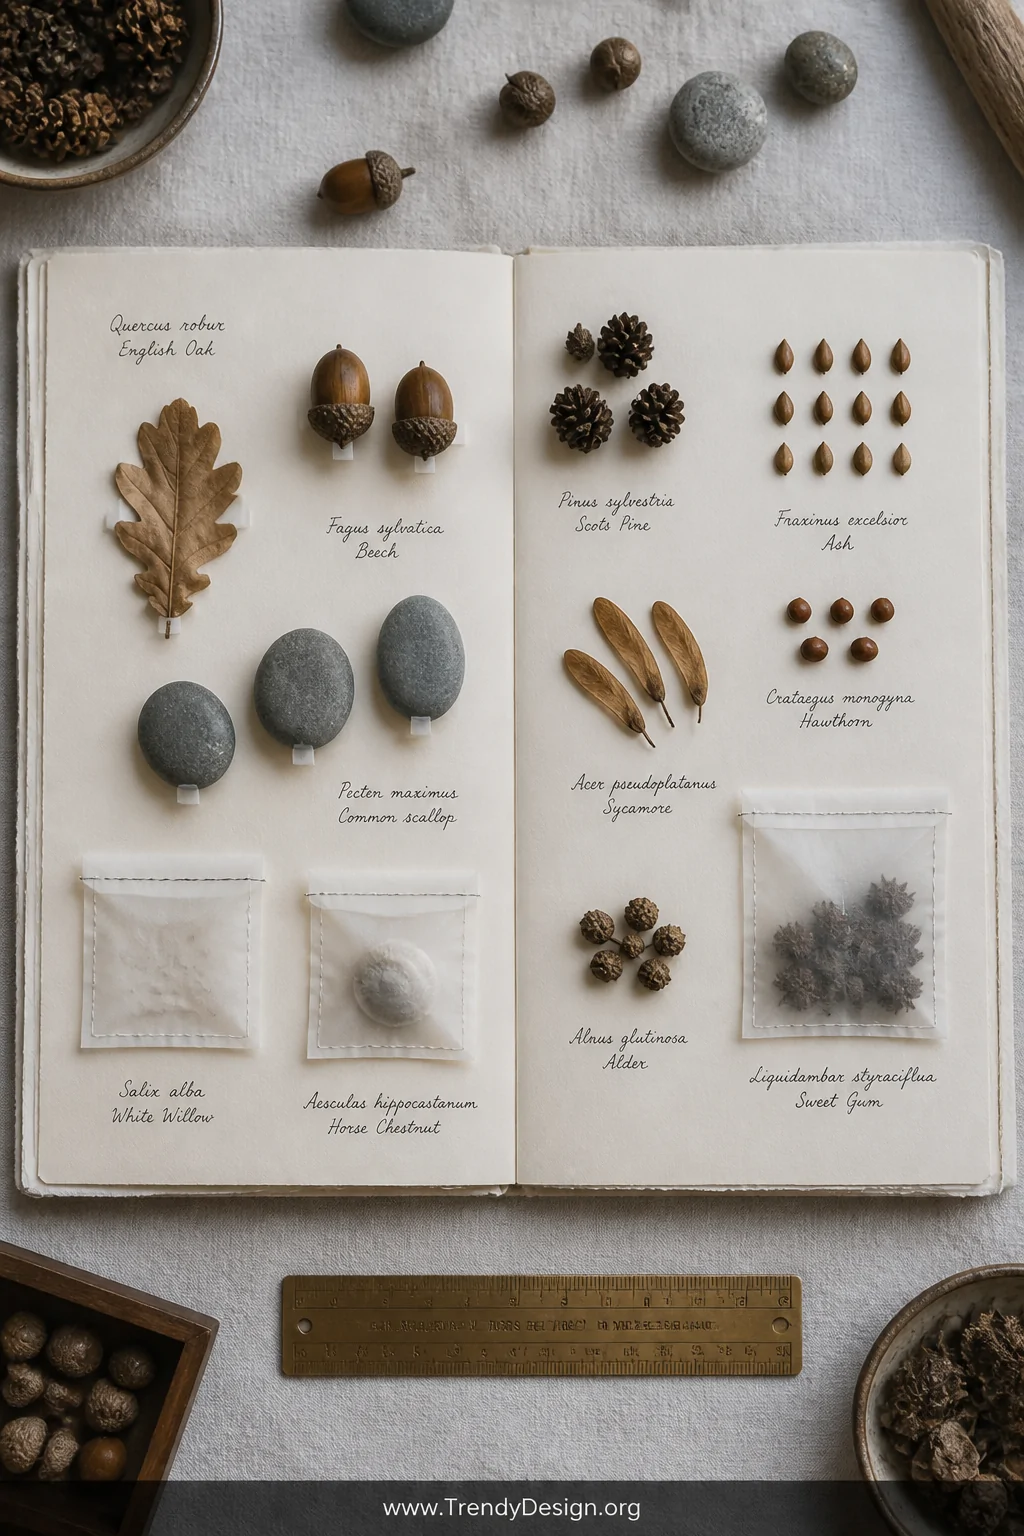
Seeds, acorns, tiny pinecones, smooth pebbles nature literally hands you free embellishments everywhere you go. Collect them in a small zip bag on your walks and sort them out when you get home.
Attach lightweight specimens directly to your pages using strong double-sided tape or foam mounting squares for a 3D effect. For heavier items like small rocks, use a glue gun with extra reinforcement. FYI, small mesh pockets or glassine envelopes sewn or glued onto the page work brilliantly for loose seeds that you want to stay touchable and interactive.
- Group specimens by color for a cohesive, gallery-worthy look
- Include a small ruler or coin in your layout photos for size reference
- Label each specimen with its common and Latin name for that chef’s kiss detail
4. Use Watercolor Washes as Nature-Inspired Backgrounds
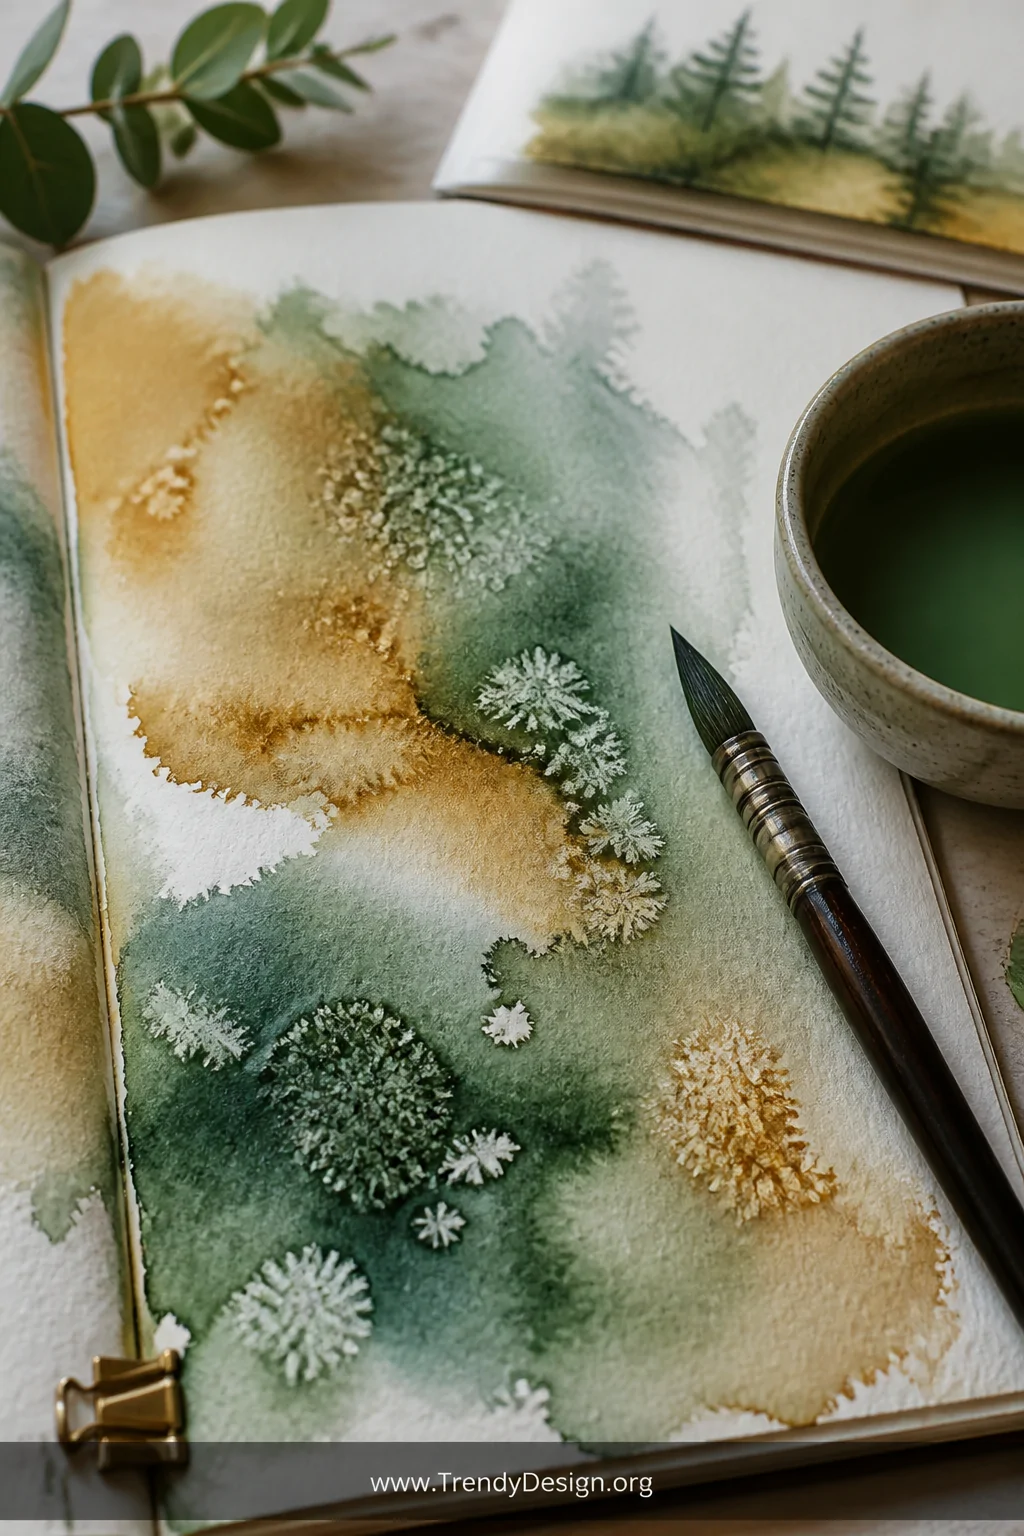
A plain white page is basically a missed opportunity. Watercolor backgrounds inspired by nature think misty forest greens, ocean blues, or golden sunset gradients instantly elevate every single element you place on top.
You don’t need to be an artist. Seriously. Wet your paper lightly, drop a few colors near each other, and let them bleed and blend on their own. Loose watercolor washes are forgiving, fast, and they make your nature scrapbook look incredibly sophisticated with minimal effort.
Pro Tips for Watercolor Backgrounds
- Use 140lb cold-press watercolor paper to prevent warping
- Salt sprinkled on wet paint creates a gorgeous organic texture
- Let pages dry completely before adding any other elements
5. Document Weather and Seasons With Journal Entries
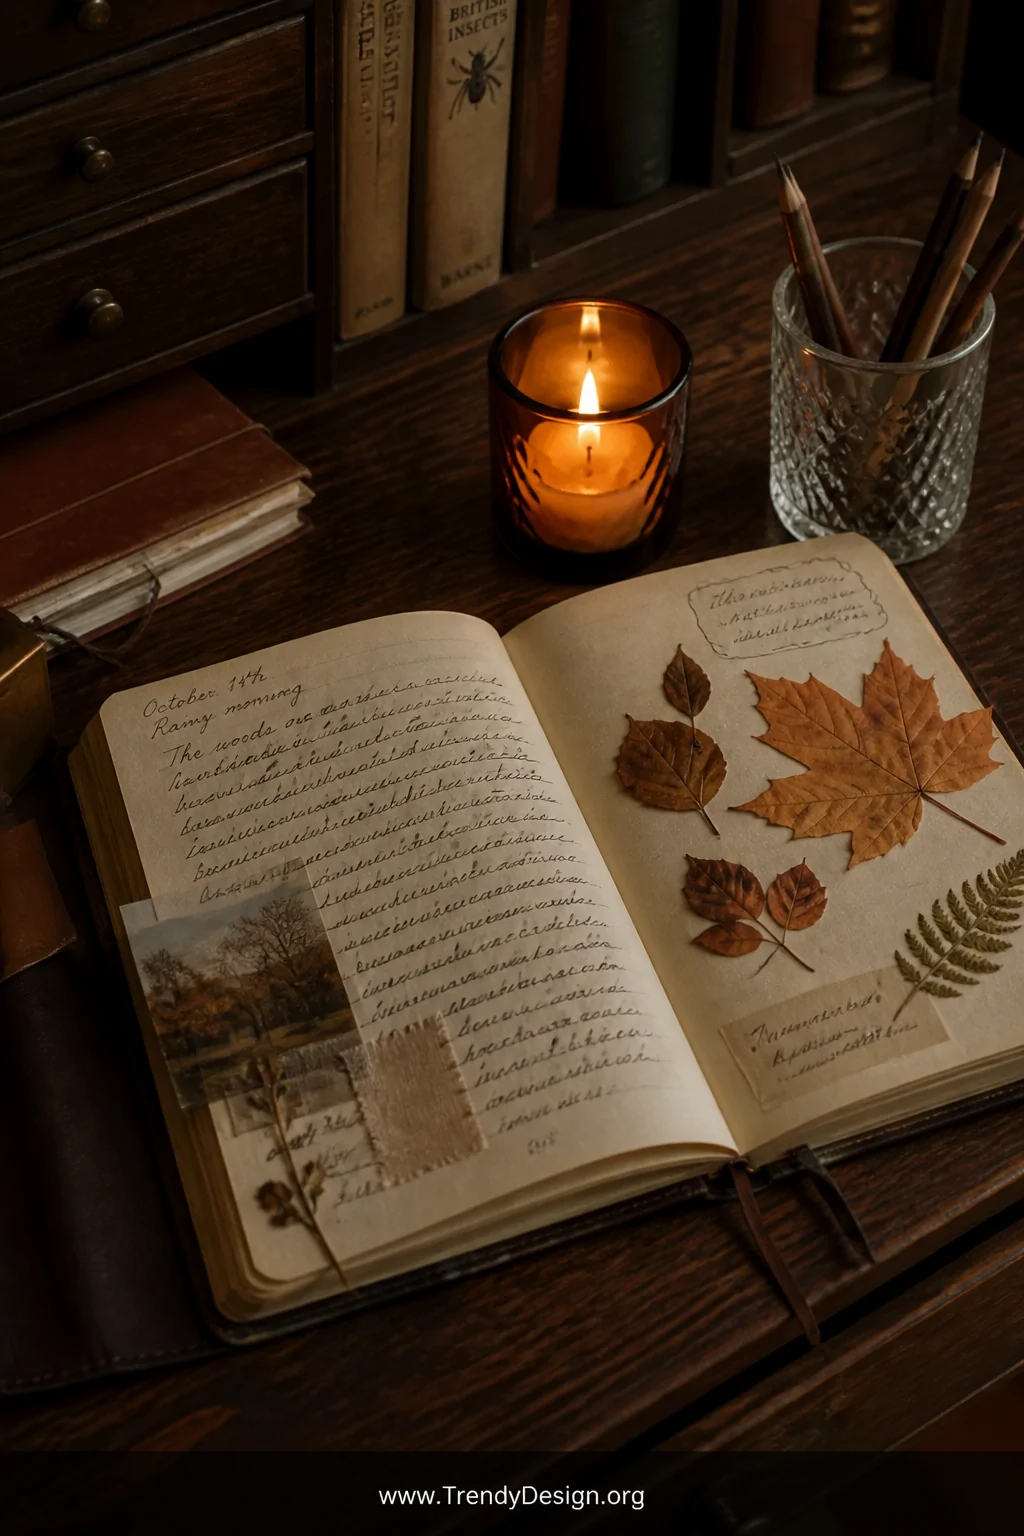
The best nature scrapbooks aren’t just pretty they tell a story. Add short handwritten or printed journal snippets describing exactly what the day felt, smelled, and sounded like when you collected each piece. Was it freezing cold? Did it smell like rain?
Seasonal journaling makes your pages deeply personal and genuinely interesting to revisit years later. Even three or four sentences tucked beside a pressed leaf transforms a decoration into a memory. That’s what separates a good scrapbook from one that gives people chills.
6. Map Your Adventures With Hand-Drawn Trail Maps
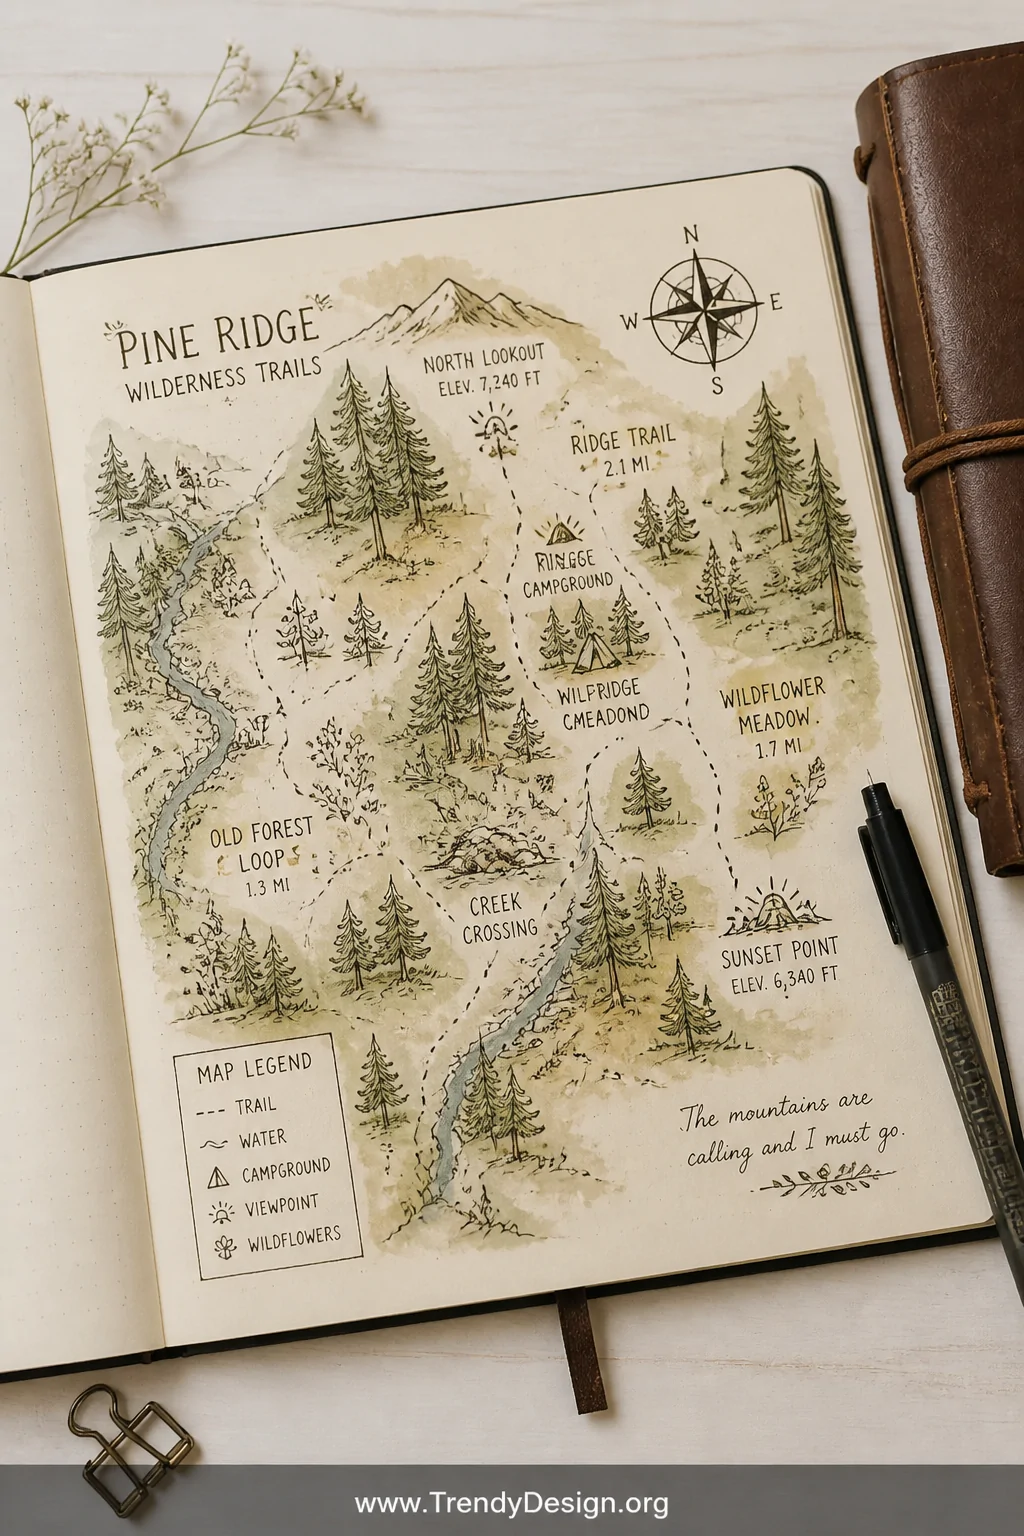
This one is SO underrated in the nature scrapbook world. Sketch a simple map of the trail, park, or beach where you collected your natural finds and use it as the anchor piece for your entire layout spread.
It doesn’t have to be geographically perfect a charming, slightly wonky hand-drawn map with illustrated trees and little landmarks is honestly more beautiful than anything Google Maps could produce. Mark spots where you found specific items with tiny illustrated icons like a small flower symbol or a bird silhouette. IMO, this is the move that makes visitors flip back to your pages twice.
- Use fine-tip black ink pens for clean, defined linework
- Add a decorative compass rose in one corner for that vintage explorer feel
- Write distances or hiking time along trail lines for practical charm
7. Incorporate Nature Photography in Creative Layouts
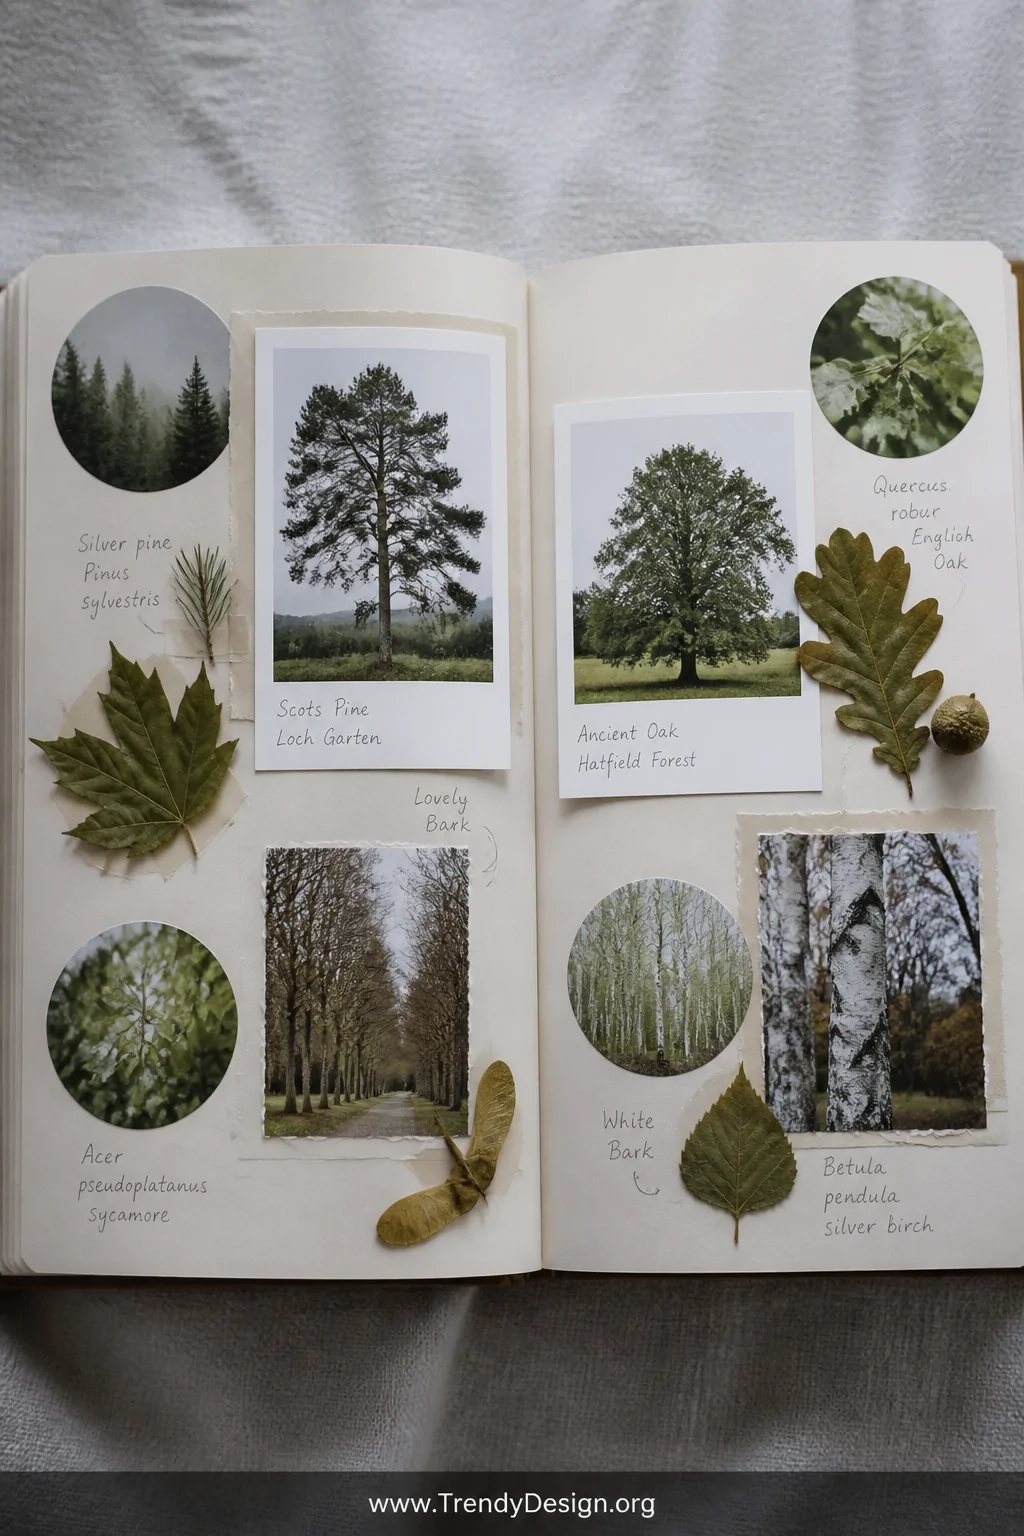
Print your nature photos in various sizes and shapes don’t just slap a 4×6 on a page and call it done. Circular crops, polaroid-style borders, and panoramic strips all add visual variety and keep the eye moving across your spread.
Layering photographs with your actual collected specimens creates a beautiful dialogue between the image and the real thing. Place a photo of a tree right next to an actual pressed leaf from that tree. Suddenly your nature scrapbook has depth and storytelling that feels genuinely intentional.
Easy Photo Styling Ideas
- Print one large hero image and cluster smaller detail shots around it
- Add handwritten captions directly on photo white borders
- Use torn photo edges instead of clean cuts for an organic, natural feel
8. Design a Full Seasonal Spread as a Nature Calendar
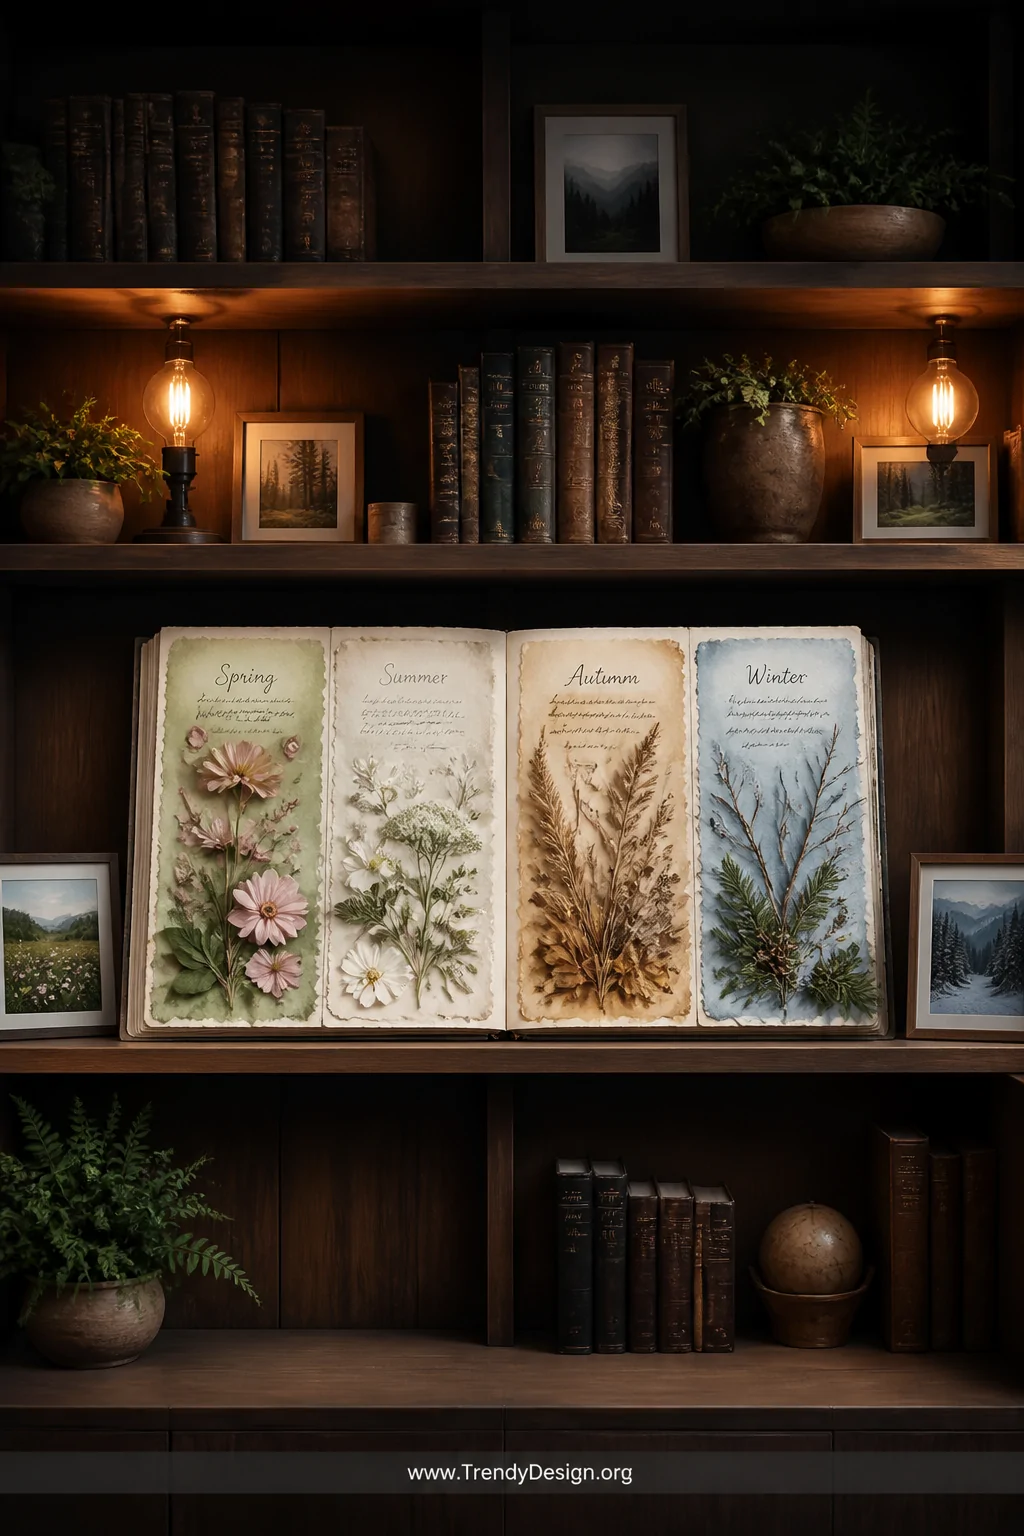
Dedicate two full pages to each season and document the same outdoor space across the whole year. Same trail, same backyard garden, same local park watched across four seasons. This project is genuinely addictive once you start.
Use a consistent layout format for each season so the pages feel cohesive when flipped through together, but swap out your color palettes and natural materials to reflect what’s actually happening outdoors. Spring gets soft greens and petals. Winter gets bare twigs, evergreen sprigs, and cool blue watercolor washes. By December, you’ll have one of the most meaningful handmade books you’ve ever created.
- Start in January or at any season there’s no wrong entry point
- Photograph the same tree or garden bed monthly to track visible changes
- Include weather data or moon phases for an extra layer of natural detail
Your nature scrapbook is genuinely one of those projects that gets better every single time you sit down with it. Start with just one page, one pressed flower, one afternoon outside and watch how quickly it grows into something you’ll treasure forever. Now go touch some grass. Literally.
Leave a Reply