Craving that effortless coastal vibe without shelling out for designer decor? Driftwood to the rescue. It’s sculptural, sustainable, and somehow makes any wall look like it belongs in a boutique hotel. Grab a few sun-bleached branches, your hot glue gun, and a playlist these seven DIYs will turn plain walls into conversation starters.
1. The Minimalist Mobile That Floats
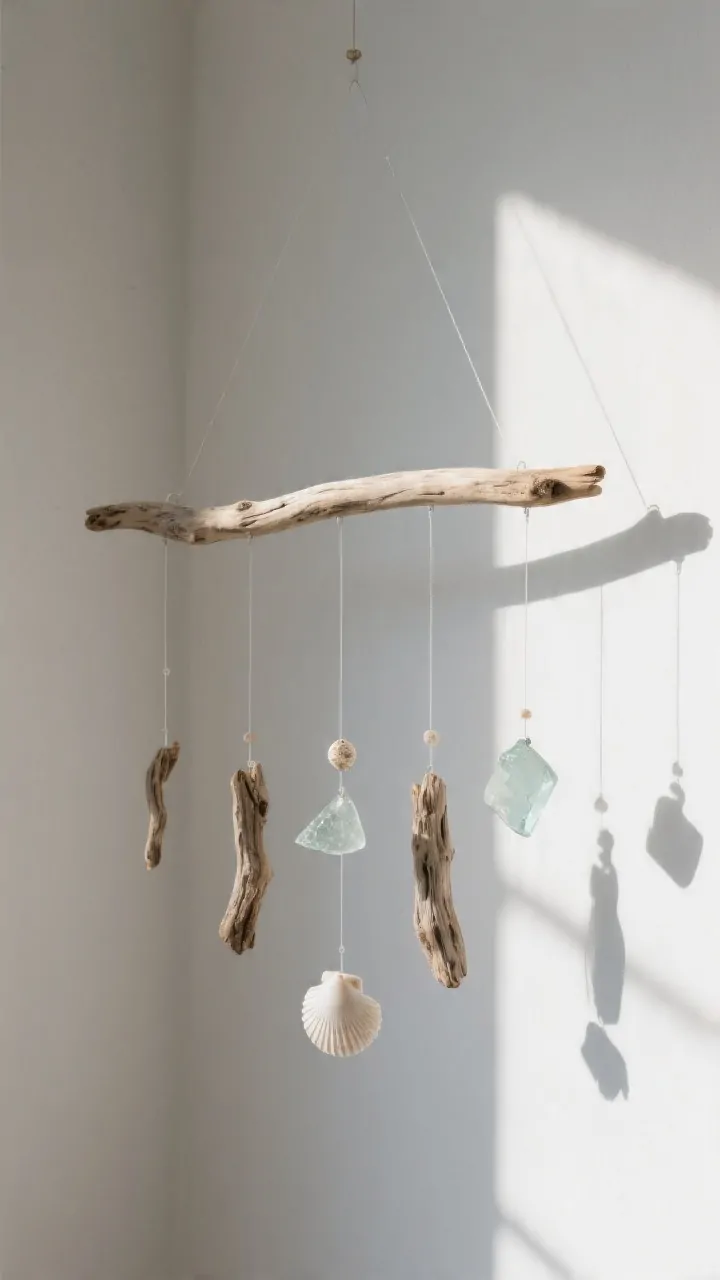
If your walls feel heavy, a light, airy driftwood mobile is the antidote. It sways gently, catches light, and adds movement aka instant zen. Plus, it’s super adaptable: go sleek and simple or boho and dangly.
What You’ll Need
- One long, straight piece of driftwood (12–24 inches)
- 3–7 smaller driftwood pieces or natural elements (shells, sea glass)
- Clear fishing line or jute twine
- Small drill or awl, scissors, and a ceiling/wall hook
How To
- Balance first: Tie your main branch at two points and hold it up find the center where it hangs level.
- String the dangles: Drill tiny holes or wrap the line around each small piece. Vary lengths for a waterfall look.
- Hang and tweak: Adjust spacing so nothing clumps. Imperfect = perfect here.
Pro tip: Use fishing line for a “floating” effect or jute twine for rustic charm. FYI: Don’t overfill negative space is your friend.
2. Gallery Ledge Meets Nature
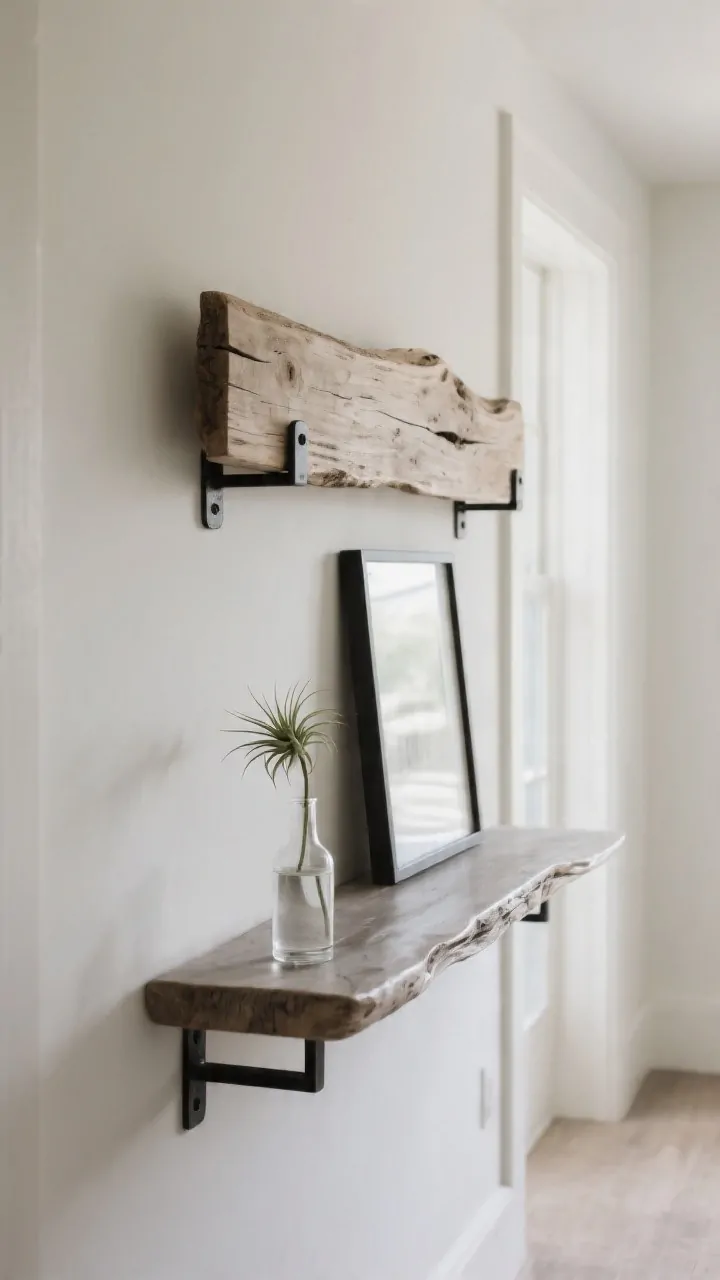
Consider a driftwood wall ledge a hybrid between a shelf and a sculpture. It’s ideal for narrow hallways or above a console where you want dimension but not bulky furniture.
What You’ll Need
- One thick, flat-ish piece of driftwood (2–4 inches deep)
- Two L-brackets (matte black looks chic)
- Wall anchors, screws, level, drill
How To
- Mount brackets: Level them on the wall, use anchors, and screw in tight.
- Secure the wood: Pre-drill and screw the driftwood to the brackets from below.
- Style it: Lean a slim frame, add a bud vase, maybe a tiny air plant.
Pro tip: Keep the load light. This is a ledge, not a bookshelf. Think art-first, storage-second.
3. Boho Tassel Wall Hanging (But Make It Coastal)
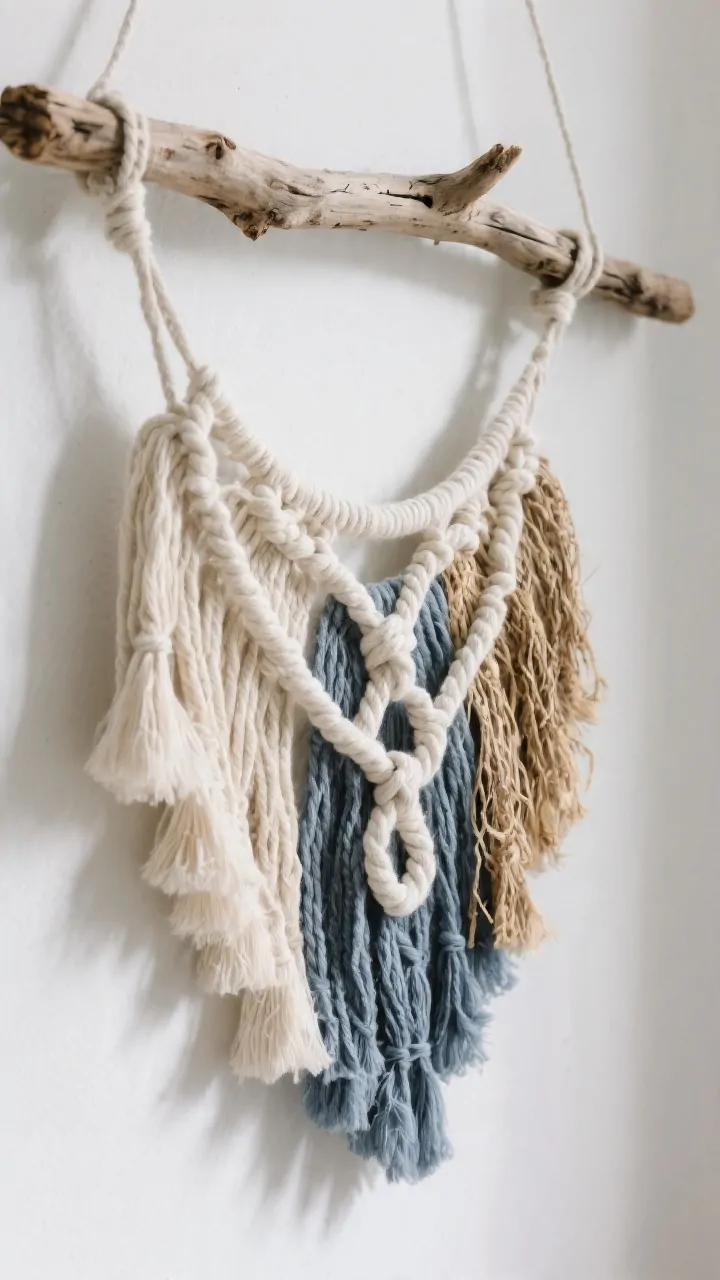
Think macramé’s breezy cousin. A driftwood and cotton tassel hanging layers softness with raw texture perfect above a bed or in that awkward empty nook that stares at you.
What You’ll Need
- One medium driftwood branch
- Cotton rope, yarn, or raffia (three tones = chef’s kiss)
- Scissors, measuring tape, comb (for fringing)
How To
- Cut strands: Measure double the final length. Loop over the branch using a lark’s head knot.
- Vary textures: Mix chunky rope with thinner yarn for depth.
- Shape the fringe: Trim into a V, U, or diagonal. Comb for that fluffy finish.
Style it smarter: Stick to 2–3 colors. Ivory, sand, and slate blue look elevated. IMO, fewer colors = more luxe.
4. Coastal Command Center (Pretty + Practical)
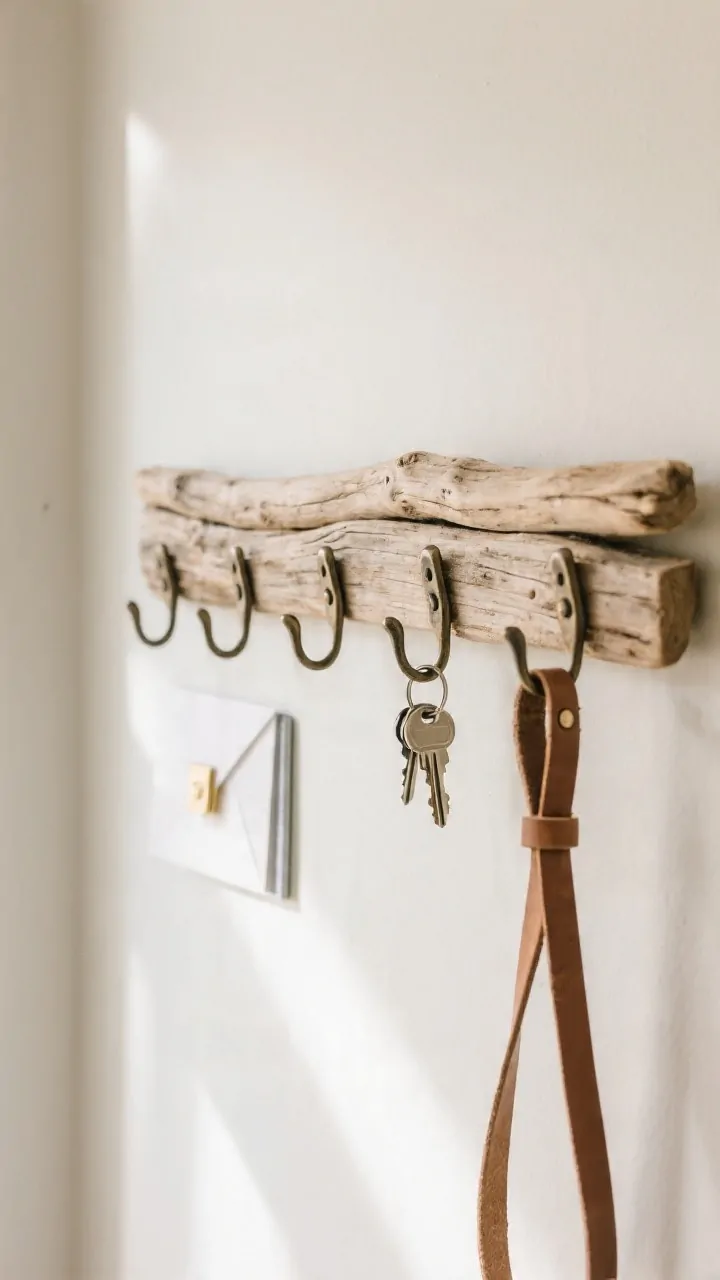
Your keys deserve a glow-up. Turn a driftwood branch into a mini command center with hooks for keys, dog leashes, or masks no ugly plastic in sight.
What You’ll Need
- One sturdy, straight-ish driftwood piece (14–24 inches)
- 5–7 cup hooks or screw-in wall hooks
- Mounting hardware or leather straps for hanging
How To
- Mark and pre-drill: Evenly space hooks along the underside.
- Secure hooks: Twist them in until snug; add a dab of wood glue if loose.
- Mount: Hang with invisible brackets or leather loops for a boutique look.
Bonus add-ons:
- Attach a tiny clip for mail.
- Hot-glue a small magnet strip on the back for spare keys.
- Stencil house numbers or a cheeky “Home, Sweet, Organized” on top.
5. Driftwood Frame For Art Or Mirrors
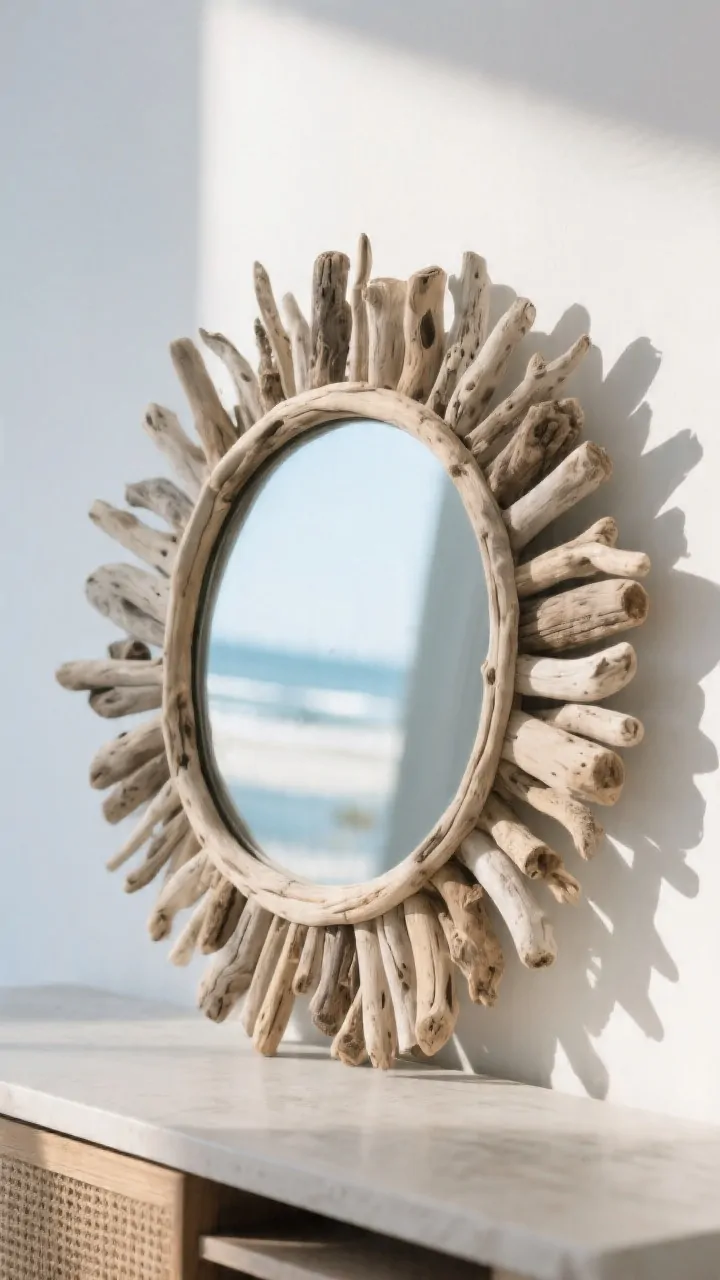
Framing can turn “random print” into “statement piece.” A driftwood frame wraps your art or mirror in natural texture and looks custom (without custom prices).
What You’ll Need
- Assorted small driftwood sticks
- Existing frame or frameless mirror
- Strong craft adhesive or construction glue, clamps
- Optional: matte sealant
How To
- Dry fit first: Lay pieces around the frame, mixing lengths and diameters.
- Layer in tiers: Glue a base ring, then add smaller pieces on top for a 3D effect.
- Seal if needed: Use a matte clear coat to prevent shedding.
Design move: Leave slight gaps for shadow play it makes the frame look sculptural. Also: keep corners irregular on purpose. Perfect is boring.
6. Botanical Hanger With Air Plants
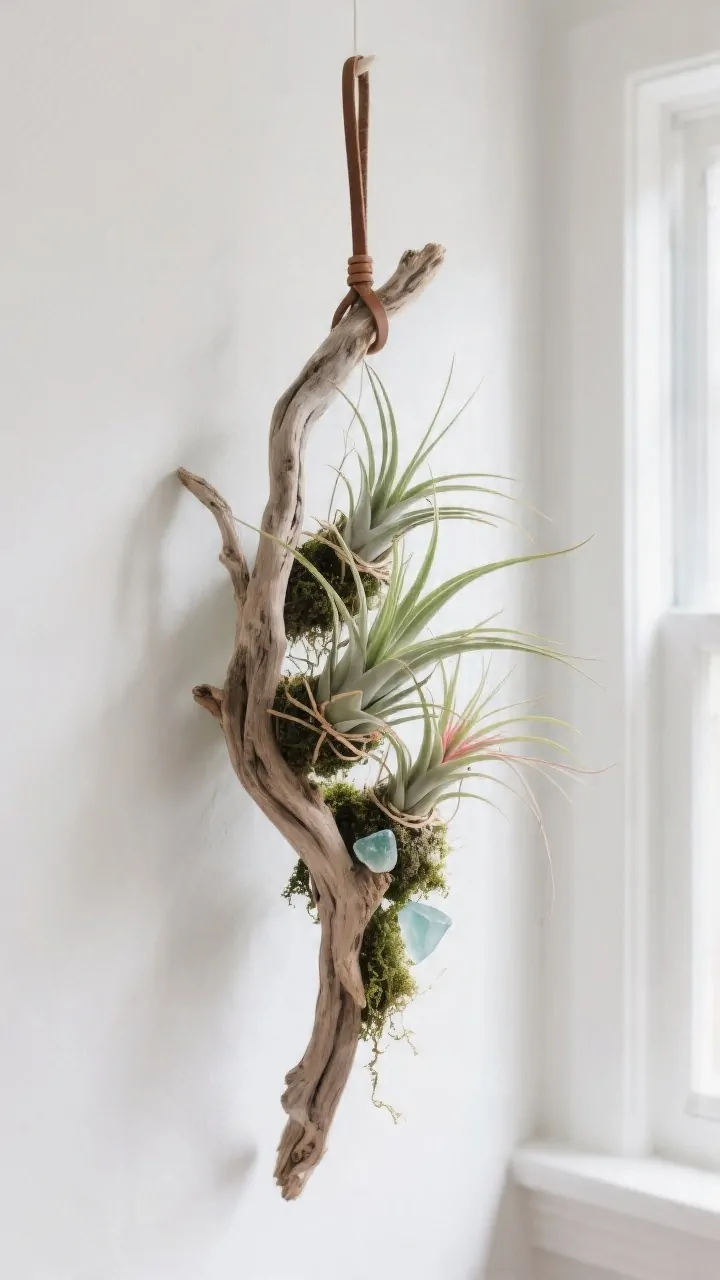
Meet the easiest green thumb moment ever: a driftwood air plant hanger. No soil. No mess. Just a pop of life that practically waters itself (almost).
What You’ll Need
- Curvy, branchy driftwood piece
- Air plants (Tillandsia), florist wire or clear fishing line
- Optional: small shells, moss, or sea glass
- Picture wire or leather cord for hanging
How To
- Plan the layout: Tuck plants into natural nooks; avoid tight wire that pinches.
- Attach gently: Wrap wire loosely or glue moss “nests” and set plants on top.
- Hang near bright, indirect light: Mist weekly; soak plants 15–20 minutes monthly.
FYI: Keep air plants out of direct hot sun. They crisp faster than your first batch of holiday cookies.
7. Statement Weave: Driftwood Loom Wall Art
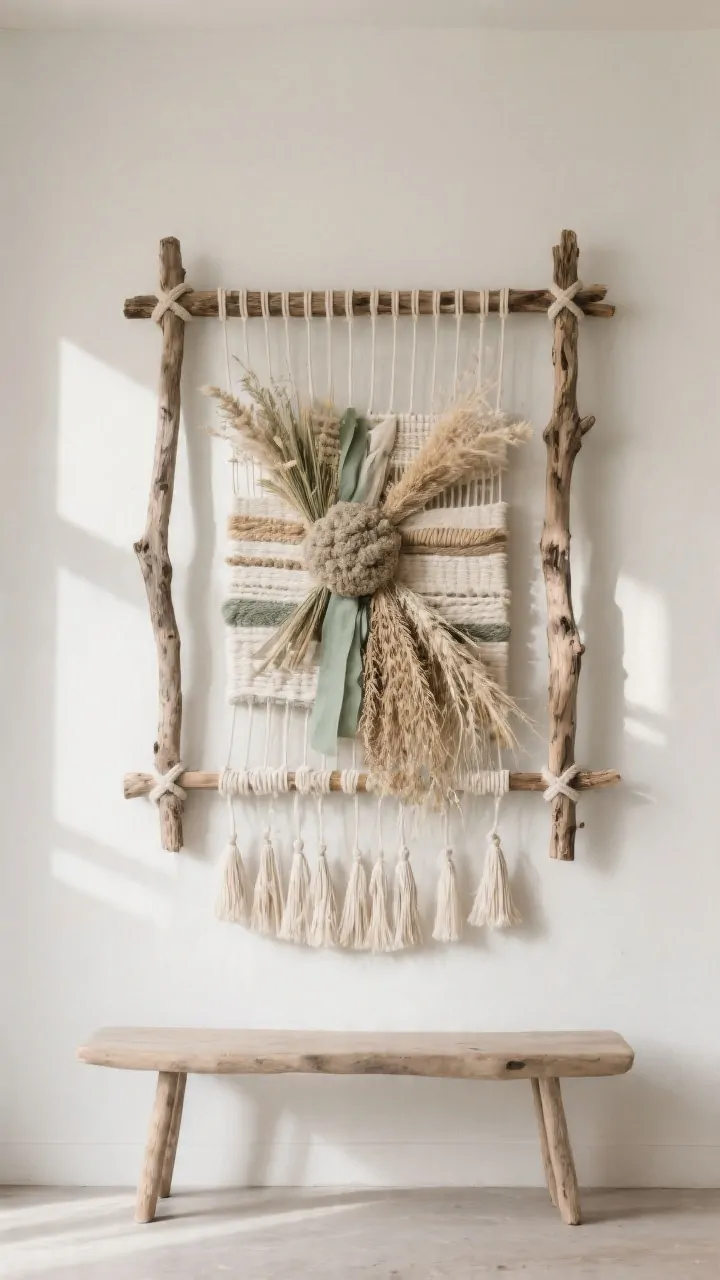
Want something bold but still organic? Build a driftwood loom and weave in fabric scraps, grasses, or ribbons for a textured art piece that looks high-end and totally unique.
What You’ll Need
- Two thicker driftwood pieces (top and bottom) and two slimmer side sticks
- Strong cord or twine for warp threads
- Weaving materials: yarn, linen strips, raffia, dried grasses, ribbon
- Hot glue (optional), scissors, hanging cord
How To
- Build the frame: Lash the four sticks into a rectangle using square knots; keep it taut.
- String the warp: Tie vertical cords from top to bottom, spaced 1/2–1 inch apart.
- Weave the weft: Over-under with varied textures; pack some rows tight, leave others loose for dimension.
- Finish: Tie off ends behind the frame; add a few hanging tassels at the bottom for drama.
Design tips:
- Limit to a neutral palette with one accent color (sage, indigo, or terracotta).
- Cluster thicker textures near the center to create a focal point.
- Let some pieces spill beyond the frame for an art-gallery vibe.
How To Choose And Prep Driftwood (Quick Guide)
- Look for: Solid pieces without soft rot; interesting knots and curves.
- Clean it: Scrub with a stiff brush. Soak in a 1:10 bleach-water solution for 15–20 minutes if needed; rinse well and dry fully.
- Seal (optional): A matte polyurethane keeps the natural color without looking shiny.
Hanging Hardware 101
- Weight check: Use anchors for anything heavier than a small frame.
- Invisible finish: Picture wire, D-rings, or Command hooks keep things clean.
- Spacing: Leave breathing room 6–12 inches from nearby art so it shines.
Sustainability note: Forage responsibly. Avoid pulling from protected areas, and leave habitats intact. You can also buy reclaimed driftwood or “driftwood-style” branches from craft stores if beaches aren’t your backyard.
Styling Ideas To Nail The Look
- Mix textures: Pair driftwood with linen curtains, woven baskets, and matte ceramics.
- Color palette: Keep it coastal-calm: whites, sands, soft blues, smoky grays.
- Layer heights: Combine one wall hanging with a low plant stand or bench for depth.
Ready to make your walls do a happy dance? Pick one project, turn on your favorite playlist, and let the wood guide you. These pieces have character built in your only job is to show it off. And if anyone asks where you got it, just wink and say, “Oh this? Limited edition… by me.”
Leave a Reply