If you’ve been scrolling through garden inspiration photos and wondering how people make their outdoor spaces look so whimsical and charming, let me introduce you to your new favorite project. Rock caterpillar garden decorations are one of the easiest, most budget-friendly ways to add personality to your yard, flower beds, or patio. They’re adorable, they’re practically indestructible, and honestly, they’ll have every visitor doing a double-take in the best possible way.
Whether you’re a seasoned DIY enthusiast or someone who just bought their first bag of craft paint, these ideas are totally approachable. Let’s dig into five fantastic ways you can bring these charming little critters to life in your outdoor space.
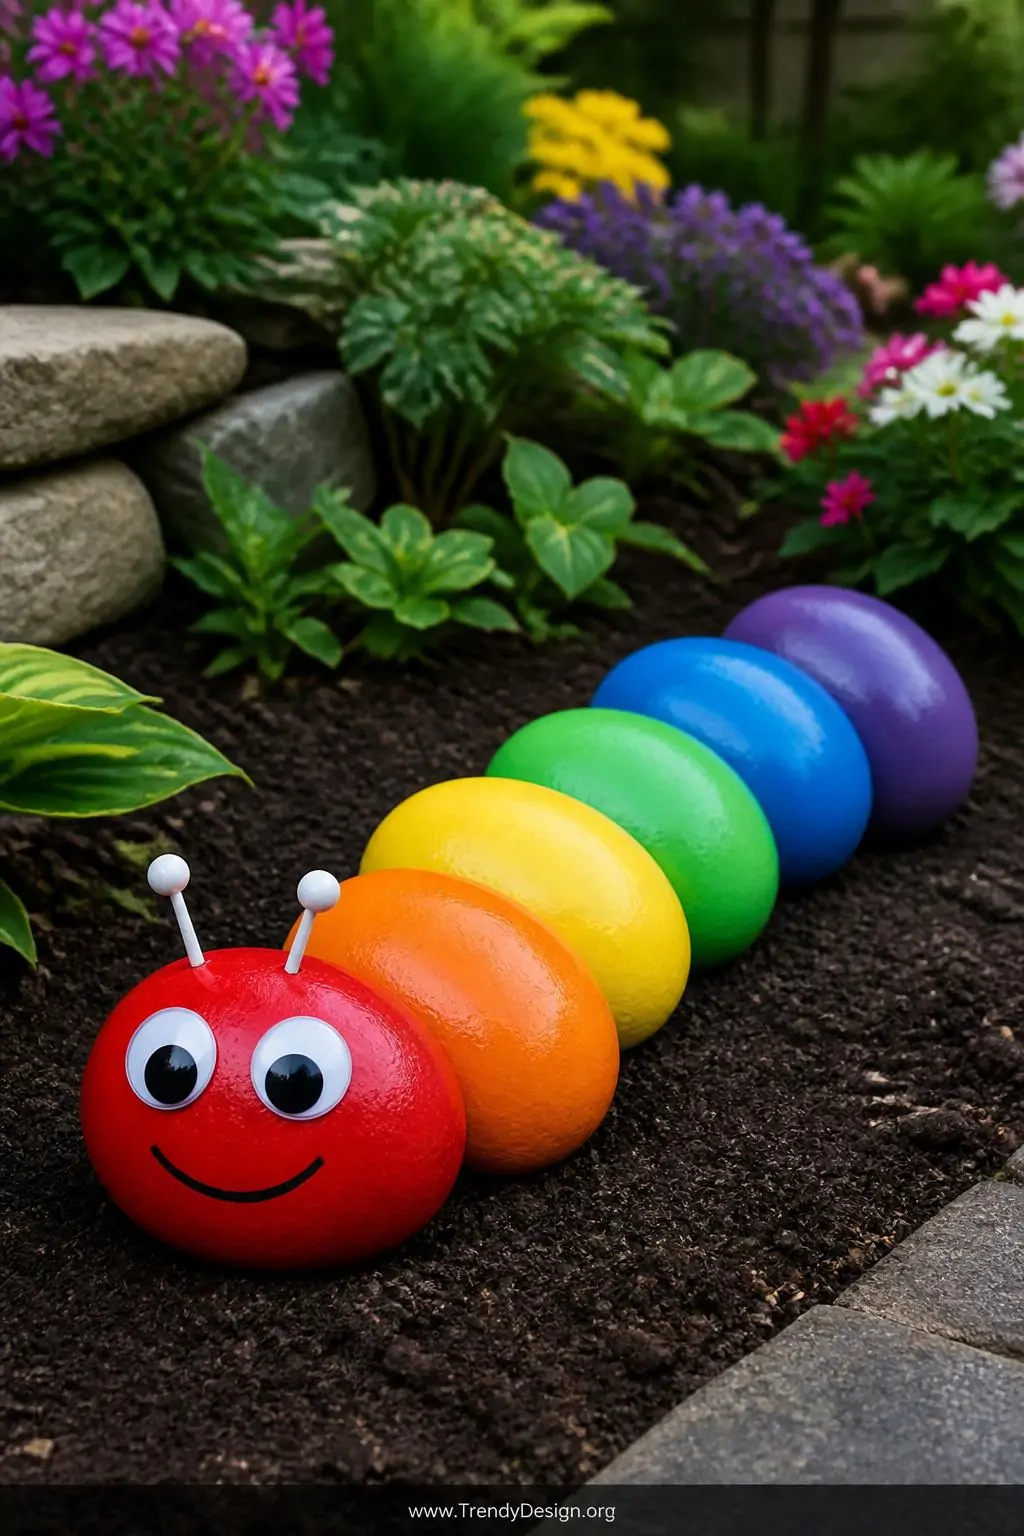
1. The Classic Painted River Rock Caterpillar
As an Amazon Associate I earn from qualifying purchases.
This is where most people start their rock caterpillar journey, and for good reason. Smooth river rocks painted in bright, cheerful colors and lined up in a gentle curved row create that instantly recognizable caterpillar silhouette that makes everyone smile. The rounded shape of river rocks is practically made for this project.
To nail this look, grab a handful of similarly sized river rocks from your local craft store or landscaping supplier. Paint each one a slightly different shade of green, or go bold with a rainbow sequence — red, orange, yellow, green, blue, purple. Add a slightly larger rock at the front for the head, paint on some googly eyes and a little smile, and boom. You’ve got a garden friend that requires zero feeding.
- Use outdoor acrylic paint for the best weather resistance
- Seal everything with a waterproof clear coat when you’re done
- Space the rocks just slightly apart to emphasize the segmented body look
- Add tiny painted antennae on the head rock for extra charm
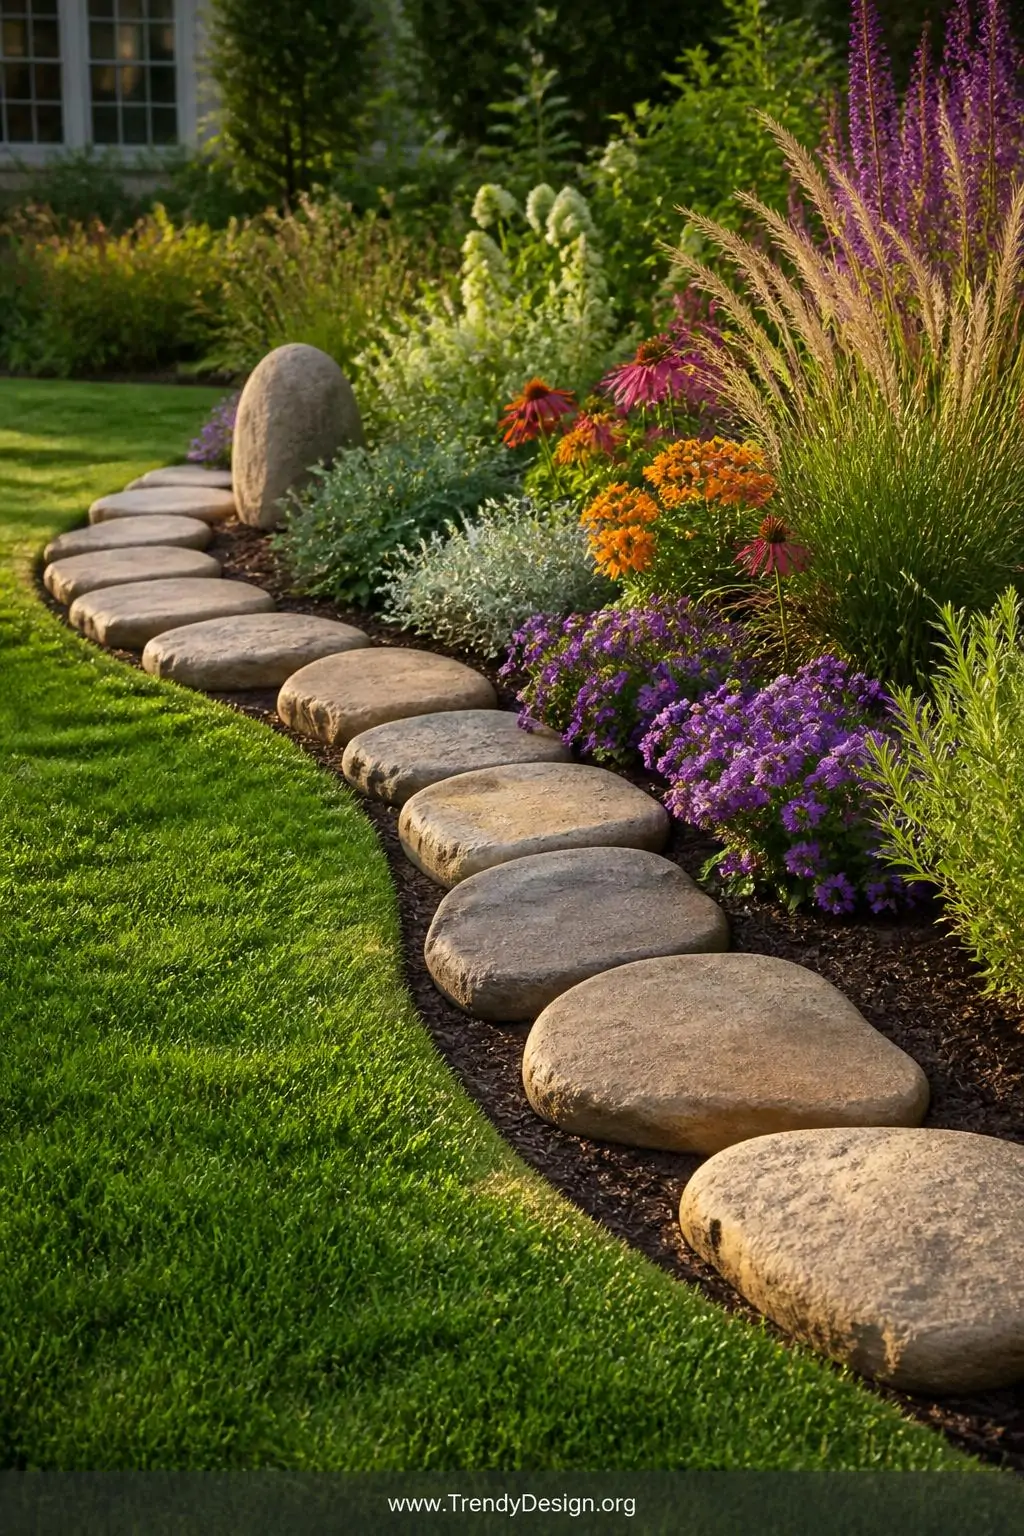
2. The Stacked Landscape Stone Caterpillar Border
As an Amazon Associate I earn from qualifying purchases.
FYI, this version is less about painting and more about strategic rock placement as a functional garden border. Using larger landscape stones or flat fieldstones, you can create a caterpillar shape that actually defines the edge of a flower bed while looking completely intentional and adorable. It’s dual-purpose decorating at its finest.
Arrange your landscape stones in a gentle S-curve or winding line along the perimeter of your garden. The key is choosing stones with similar shapes and sizes so the “body segments” look cohesive. Use one distinctly rounder or taller stone at one end as the head, and maybe tuck a few colorful flowers right behind the caterpillar to complete the garden-scene vibe.
Pro Tips for Stone Placement
- Partially bury each landscape stone so it looks anchored and intentional
- Use landscaping adhesive if you want permanent placement
- Choose stones with natural color variation for a more organic look
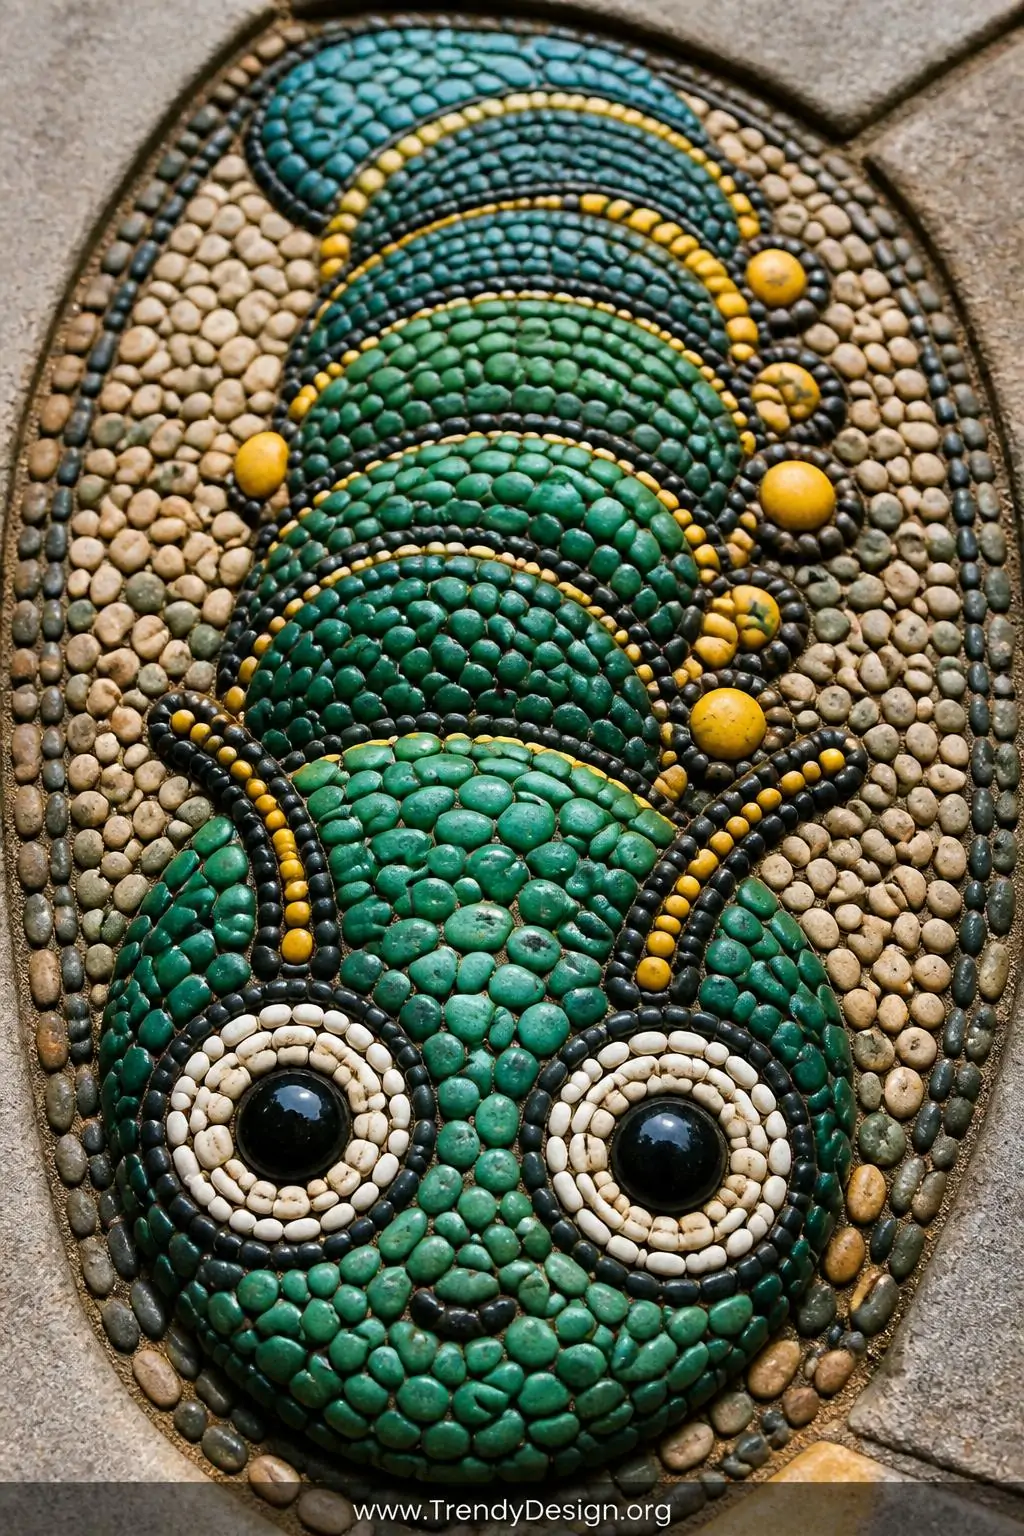
3. The Mosaic Pebble Caterpillar Pathway Accent
As an Amazon Associate I earn from qualifying purchases.
This one is for the creatives who love a little extra texture and detail. Small mosaic pebbles pressed into cement or outdoor-safe grout can create a stunning caterpillar design right in your garden pathway or patio. It looks like something you’d find at a fancy botanical garden, but you can totally make it yourself on a Saturday afternoon.
Sketch your caterpillar shape first using chalk on your patio surface or on a stepping stone blank. Then press colorful pebbles into your base material in a tightly packed mosaic pattern. Mix greens with a pop of yellow or turquoise for the body segments, and use contrasting pebbles for the eyes and smile. IMO, this is the most impressive-looking version of the rock caterpillar garden decoration on this entire list.
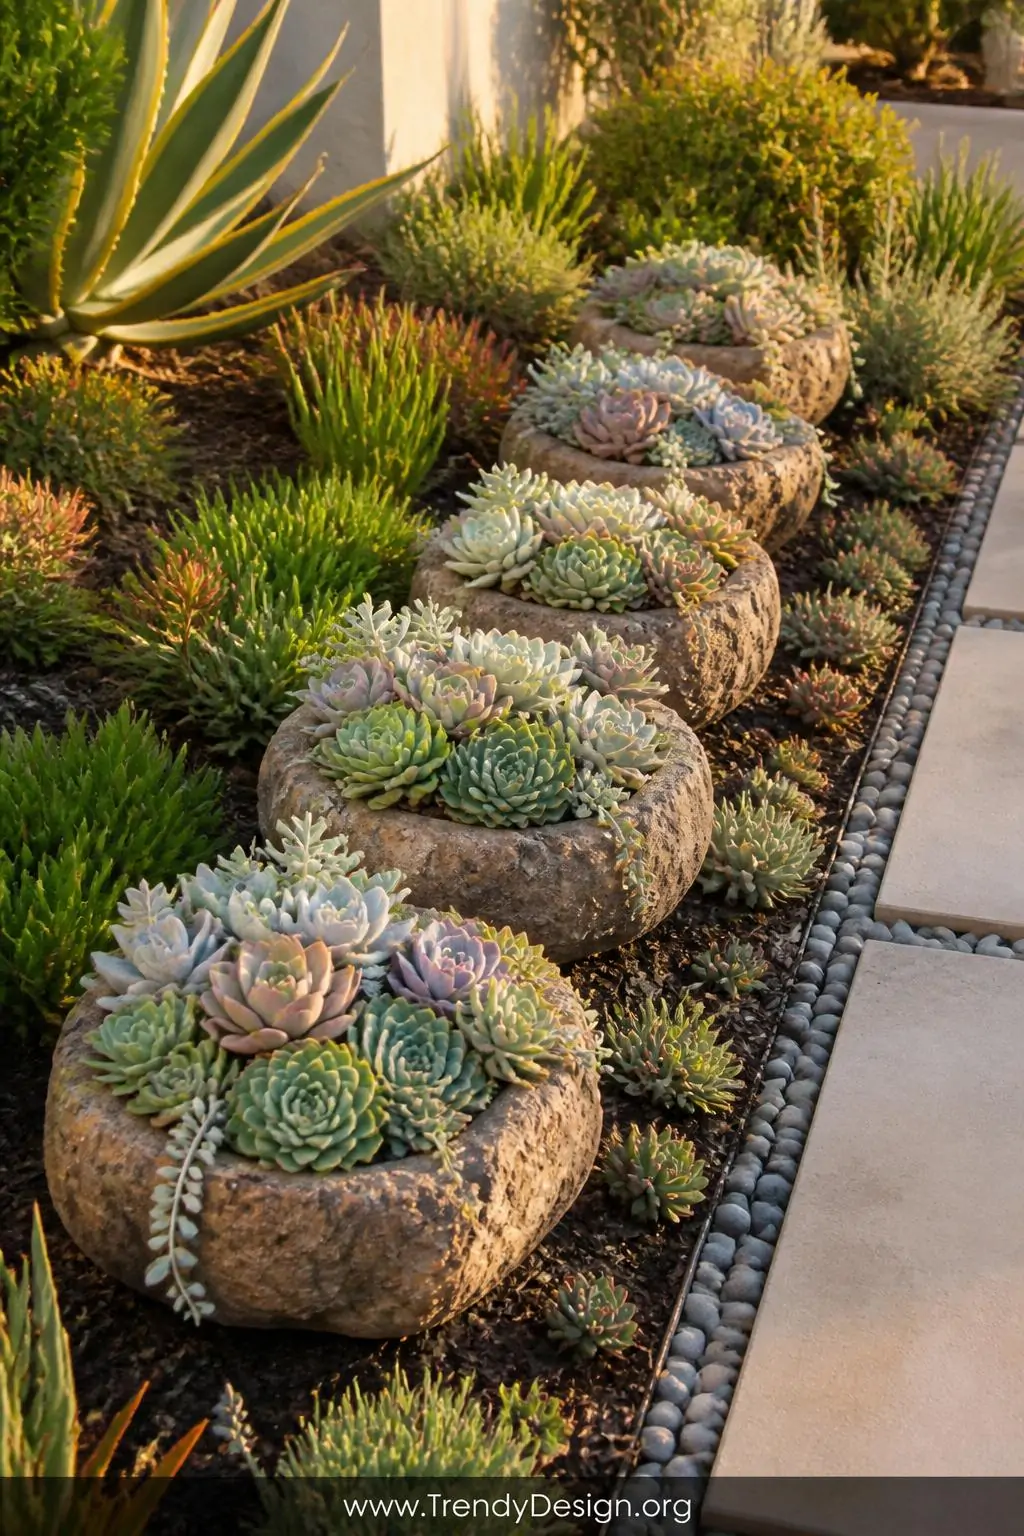
4. The Succulent-Topped Rock Caterpillar Planter
As an Amazon Associate I earn from qualifying purchases.
Okay, this idea is genuinely genius. Using hollow concrete or ceramic rocks — the kind designed as small planters — you can line them up in a caterpillar formation and plant a tiny succulent in each one. The result is a living, growing caterpillar that changes and evolves with the seasons. How cool is that?
Choose planters that are roughly the same size and shape for that satisfying segmented look. Echeveria, hens-and-chicks, or sedum work beautifully because they stay compact and low-maintenance. Position your caterpillar planter row in a sunny spot, and let the succulents spill slightly over the edges for a full, lush appearance that looks effortlessly styled.
- Make sure each rock planter has drainage holes
- Use cactus and succulent soil mix for best results
- Group different succulent varieties for visual interest
5. The Glow-in-the-Dark Garden Rock Caterpillar
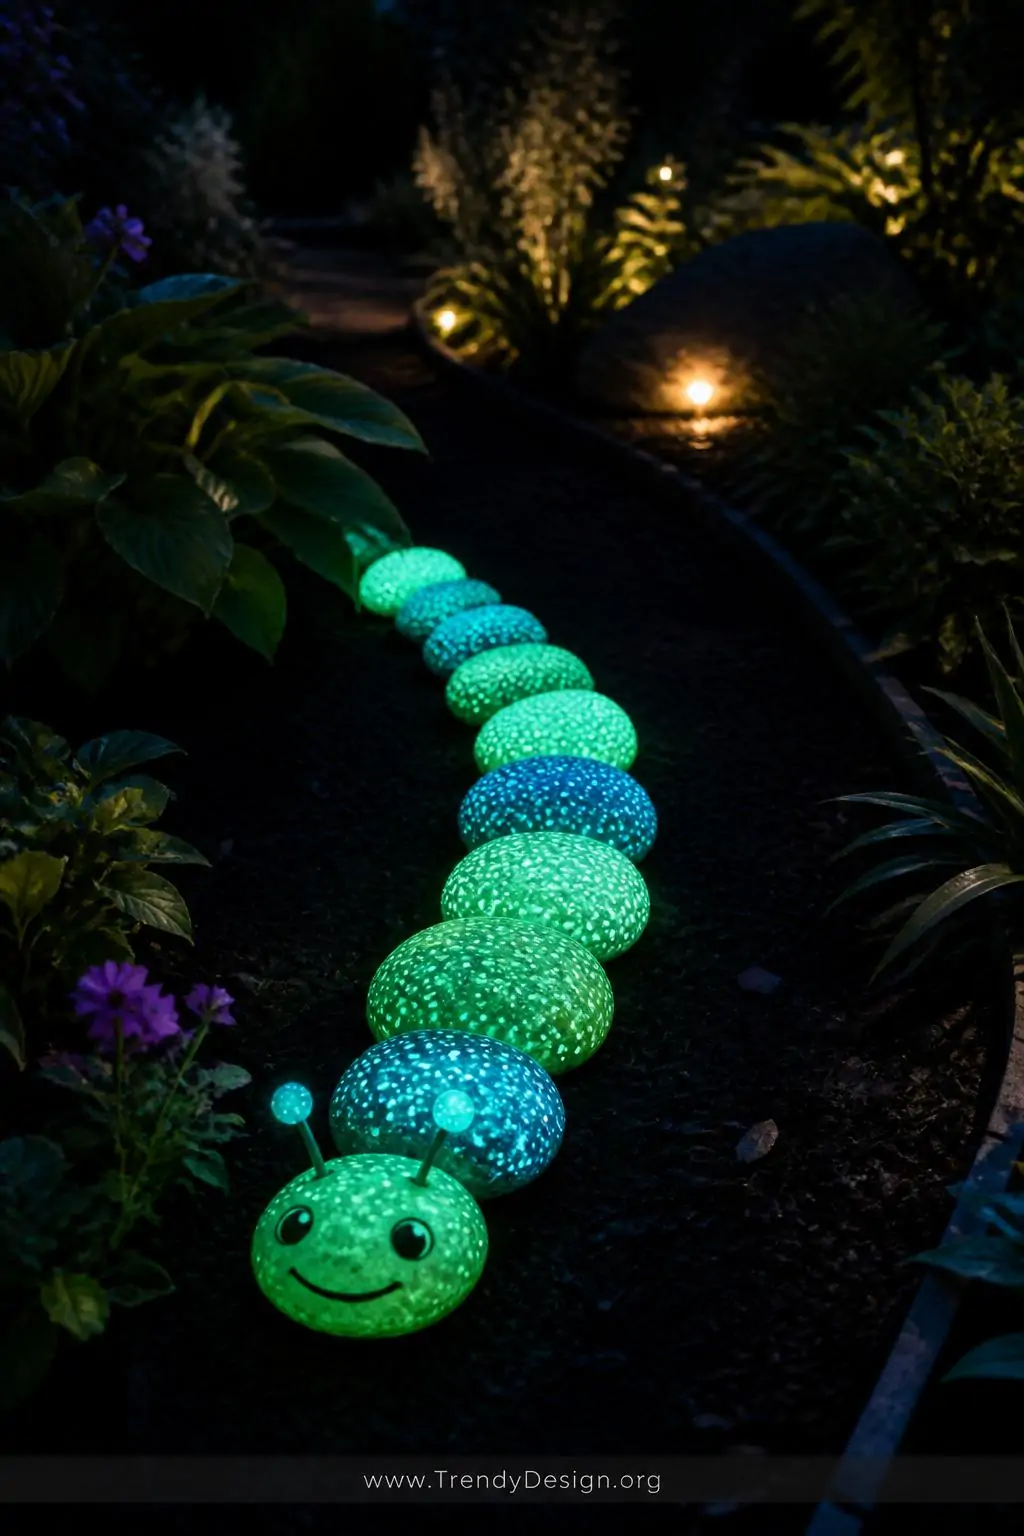
As an Amazon Associate I earn from qualifying purchases.
Want your garden to be just as magical at night as it is during the day? Glow-in-the-dark painted rocks arranged in a caterpillar shape are an absolute showstopper after sunset. Kids especially go absolutely wild for this one, and honestly, so do adults who claim they’re just helping their kids set it up.
Paint your rocks with glow-in-the-dark outdoor paint, available at most craft and hardware stores. Let them charge up in the sunlight during the day, and they’ll softly illuminate your garden path or flower bed all night long. Combine with regular painted details for a design that looks great around the clock.
The Bottom Line
Rock caterpillar garden decorations are one of those rare projects that are simple enough for beginners but satisfying enough for experienced crafters. From painted river rocks to glowing nighttime displays, there’s a version on this list for every style, budget, and skill level.
The best part? Your garden becomes completely one-of-a-kind the moment one of these charming little creatures takes up residence in your flower bed. So grab some rocks, grab some paint, and get creating. Your garden — and your neighbors — will thank you.
Leave a Reply